TRIM is an important feature that keeps SSDs fast and healthy on Windows 11 by telling the drive which freed blocks are no longer in use. Without TRIM, an SSD will slow down, causing a degradation in PC performance. This is because, without it, the drive must read, update, and rewrite data each time you save a file.

This guide explains how to check whether TRIM is enabled on your Windows 11 PC. Although Windows 11 automatically runs TRIM weekly, it’s still a good idea to verify its status, ensure your drive supports it, and run it manually if needed.
Table of Contents
What is TRIM on Windows 11
TRIM is a command that lets Windows tell a solid-state drive (SSD) which blocks of data are no longer in use (for example, after you delete a file). Without TRIM, the SSD doesn’t know which storage locations are free, so it must treat more blocks as if they might still hold important data. That makes future writes slower because the drive has to erase and rewrite extra data first.
SSDs store data differently than hard drives: they must erase whole blocks before rewriting them. TRIM improves performance and extends the SSD’s lifespan by allowing the drive to pre-clean unused blocks during idle time instead of doing that work during writes. This keeps everyday tasks (like saving files or installing software) faster and reduces wear on the flash memory.
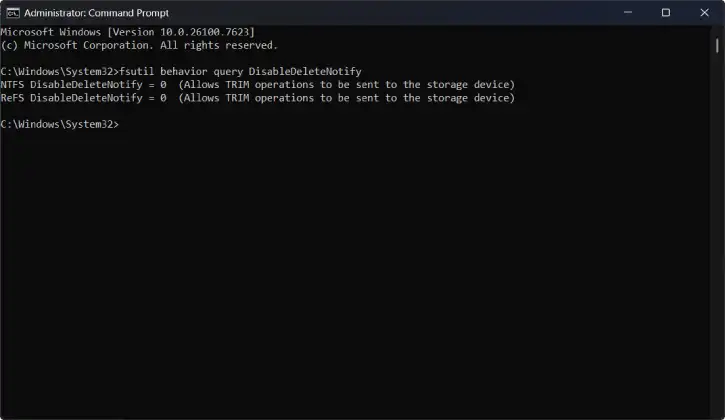
Windows 11 automatically enables TRIM for most SSDs. You don’t usually need to do anything: the OS sends TRIM commands after deletions and during maintenance. You can check or confirm it via the command prompt (administrator) using “fsutil behavior query DisableDeleteNotify” — a response of 0 means TRIM is enabled.
Fun fact: Although people often written it is as TRIM, it isn’t an acronym and doesn’t stand for anything.
ALSO READ: How to Check SSD Health On Windows 11 PC
How to Check Whether TRIM is Enabled on Windows 11?
1. Open the Start menu, type “cmd”, right-click Command Prompt, and choose Run as administrator.
2. In the Command Prompt window, type: fsutil behavior query DisableDeleteNotify and press Enter.
3. Read the result. If it says DisableDeleteNotify = 0, TRIM is enabled (good). If it says DisableDeleteNotify = 1, TRIM is disabled.
4. Close the Command Prompt when you’re finished.
How to Enable TRIM Support for SSDs on Windows 11
1. Open the Start menu, type “Command Prompt” or “Terminal”.
2. Right‑click the app in the results and choose Run as administrator.
3. In the window that opens, type: fsutil behavior set DisableDeleteNotify 0 and press Enter.
4. (Optional) Verify TRIM is enabled by typing: fsutil behavior query DisableDeleteNotify
Press Enter.
5. If it shows DisableDeleteNotify = 0, TRIM is enabled.
6. Close the Command Prompt.
How to Disable TRIM on Windows 11
1. Open the Start menu, type “Command Prompt” or “Terminal”.
2. Right‑click the app and choose Run as administrator.
3. Type: fsutil behavior set DisableDeleteNotify 1 and press Enter.
4. (Optional) Verify by running: fsutil behavior query DisableDeleteNotify
5. If it shows DisableDeleteNotify = 1, TRIM is disabled.
6. Close the Command Prompt.
How to Run TRIM Manually for SSDs on Windows 11
2. Click the Start button and type PowerShell (or Terminal).
2. Right-click the PowerShell result and choose Run as administrator.
3. In the window that opens, type: Optimize-Volume -DriveLetter C -ReTrim -Verbose
[Replace C with the letter of the drive you want to trim].
4. Press Enter. Watch the messages — it should finish in a few minutes.
5. You can also use Command Prompt to execute the command. Open Command Prompt as administrator and run: defrag C: /O
6. This also triggers the SSD retrim feature, but PowerShell command is better for SSDs.
Do you Need to Run TRIM manually?
Usually, no. Windows 11 runs TRIM automatically on a weekly schedule (default). Run it manually only if you just deleted or uninstalled a very large amount of data (for example, a 150 GB game or a big folder of videos). Doing so lets the SSD know those blocks are free immediately, which helps future writes stay fast.
FAQs
What is TRIM on Windows 11, and why does it matter?
TRIM is a command your PC sends to an SSD to tell it which blocks of data are no longer needed. That lets the SSD clean up unused space in the background, keeping the drive running smoothly and avoiding extra wear.
Is TRIM turned on by default in Windows 11?
Yes. Windows 11 automatically enables TRIM for supported SSDs and usually runs it on a weekly schedule. You don’t need to do anything.
Should I ever turn TRIM off?
Almost never. Turning it off can make your SSD slower over time. Only disable TRIM temporarily for specific testing or troubleshooting—rare cases only.
Will TRIM make my SSD faster?
TRIM won’t boost the maximum speed of the drive, but it helps the SSD keep steady performance over time by preventing slowdowns that happen as the drive gets full.
Is TRIM the same as defragmenting?
No. Defragmenting is for old spinning hard drives. For SSDs, Windows runs TRIM (not defragmentation) when you use the Optimize Drives tool.
Does TRIM shorten my SSD’s life?
No. TRIM actually helps your SSD last longer by avoiding unnecessary write operations.
Will TRIM work with every SSD?
Most modern consumer SSDs support TRIM and will work with Windows 11. It requires the drive and the connection (SATA, NVMe, etc.) to support the TRIM command.
Conclusion
TRIM is a small but essential feature that keeps SSDs fast and healthy by letting the drive reclaim and manage unused space—Windows 11 enables it automatically for supported drives and schedules regular maintenance, so you rarely need to intervene. Turning TRIM off is generally unnecessary and can lead to slower, less efficient storage over time; only consider disabling it briefly for specific tests or troubleshooting. In short: leave TRIM enabled, use the built-in Optimize Drives tool when needed, and your SSD will maintain consistent performance and longevity.