
Watermarks are a powerful tool for marking documents as drafts, confidential, or under review. Whether you’re managing sensitive files or preparing documents for different stages of the workflow, knowing how to add and remove watermarks in Google Docs is essential. The process is straightforward and gives you full control over how your documents appear to readers.

In this guide, we’ll walk you through both adding and removing watermarks so you can keep your documents organized and professional at every stage.
Table of Contents
What Are Watermarks and Why Use Them?
Watermarks are text or images that appear behind your document content on every page. They’re automatically applied to all pages, making them perfect for indicating a document’s status or ownership. Common uses include marking documents as “DRAFT,” “CONFIDENTIAL,” “FINAL,” or adding your company logo for branding purposes.
The key advantage is that watermarks don’t interfere with your actual content—they sit behind the text, allowing readers to view your document clearly while still seeing the watermark designation.
How to Add a Watermark in Google Docs in 2026
Adding a watermark takes just a few clicks. Follow these steps to get started:
1. Open your Google Docs document on your computer and ensure you’re viewing the edit mode.
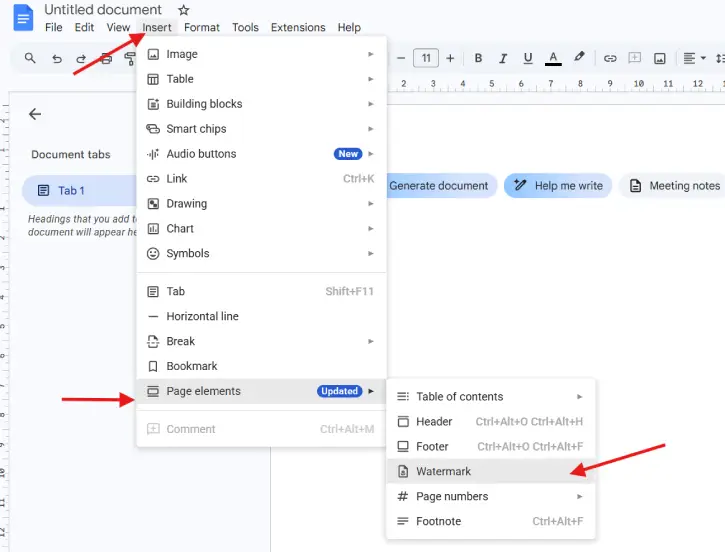
2. Click the Insert tab at the top of the screen.
3. Navigate to Page Element, then select Watermark from the dropdown menu.
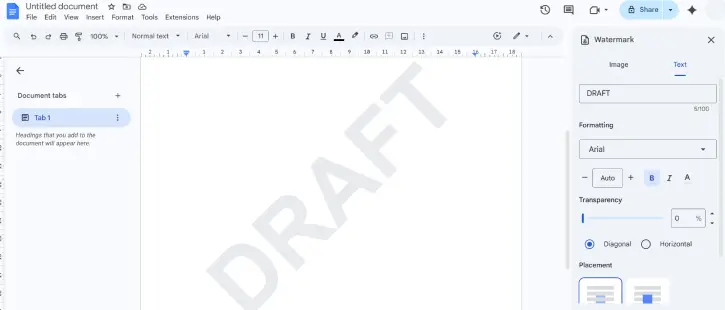
4. Choose your watermark type in the sidebar panel that appears on the right:
- Image watermark: Click to upload an image from your computer (useful for logos or branded images)
- Text watermark: Type your desired text (such as “DRAFT” or “CONFIDENTIAL”)
5. Customize your watermark:
- For text watermarks, adjust the font, size, and formatting to match your preferences
- Set the transparency level to control how prominent or subtle the watermark appears
- For image watermarks, the system will automatically size it appropriately
6. Click Done to apply the watermark to your document.
Your watermark will now appear behind all content on every page of your document.
How to Remove a Watermark from Google Docs in 2026
When you’re ready to finalize your document or no longer need the watermark, removal is equally simple:
1. Open the document containing the watermark you want to remove.
2. Click the Insert tab at the top of the screen.
3. Go to Page Element and select Watermark from the menu.
4. In the sidebar panel, locate and click Remove watermark at the bottom of the options.
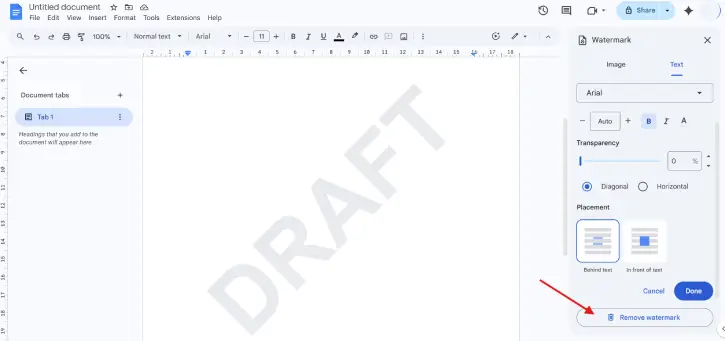
5. Click Done to finalize the removal.
The watermark will immediately disappear from all pages in your document.
Important Limitations to Know
One key limitation to be aware of: the watermark feature is not available in pageless format. If you’re using Google Docs’ pageless layout, you’ll need to switch to a standard page format to add or edit watermarks. You can change this in the File > Page Setup menu.
Conclusion
Adding and removing watermarks in Google Docs is a simple yet effective way to manage your documents throughout their lifecycle. Whether you’re collaborating on drafts, marking sensitive materials, or preparing final versions for distribution, watermarks give you professional control without cluttering your content. Now that you know how to use this feature, you can keep your document workflow organized and clear.