
More and more people are switching to Linux, especially since Microsoft has stopped supporting Windows 10. This means that many older PCs won’t work well with Windows 11, making them feel outdated. Linux offers a free option for these users to keep their computers running smoothly and securely.
Switching to Linux can have some challenges. Not all older PCs have the right hardware, like Wi-Fi and sound drivers, to run modern Linux smoothly. Plus, problems during installation or setup can be very frustrating for users.
In this case, installing Linux on an external SSD is a great way to test your PC’s performance and see if all your hardware works correctly with it.
If you’re considering trying Linux, here’s a simple guide for installing it on an external SSD. This method lets you keep your Windows installation intact while safely using Linux. However, keep in mind that it might be a bit slower in terms of performance.
Table of Contents
What You’ll Need to Install Linux on an External SSD
- A working Windows PC
- An external SSD in a USB enclosure (or a spare internal SSD) — this guide assumes an external SSD
- A USB flash drive for creating Linux installation media
Before you start, find your PC’s BIOS key – common keys include, F2, Delete, F12, F10, Esc, or F1. If you aren’t sure, Google “[your model] BIOS key” (for example, “MSI B550 Tomahawk BIOS key”) to find the exact key.
How to Prepare Your SSD for Linux Installation
- Connect the SSD to your Windows PC.
- Open Command Prompt as Administrator.
- Type
diskpartand press Enter. - Next, type
list diskand press Enter. - Identify your external SSD in the displayed list (for example, “Disk 1”).
- Type select disk replacing with your drive’s number (e.g., select disk 1), then press Enter.
- Next, type
cleanand press Enter – this will erase all data on the selected drive.
Your SSD is now ready for the installation of your preferred Linux operating system. Follow these steps to create a bootable Linux USB drive.
Creating a Bootable Linux Drive for Your SSD Installation
1. Download a Linux ISO file: Mint, Zorin OS (windows-like interface), or Ubuntu).
2. Download Rufus on your Windows PC to create a bootable USB drive.
3. Now, plug in a USB flash drive (8 GB or larger) to your PC.
4. Open Rufus, select the USB drive, choose the downloaded ISO, and click Start to create the bootable USB.
5. After creating a bootable Linux drive, restart the computer and enter the BIOS/UEFI settings using the above-mentioned keys.
6. Set the USB drive as the first boot device, save changes, and reboot.
7. Your PC will boot into Live USB and you can follow the on-screen option to install the Linux distro.
Important: You may need to disable Secure Boot to install Linux. If you cannot access the option to toggle Secure Boot, you probably haven’t set a BIOS password. Create a memorable password so the system lets you change firmware settings when necessary. Write the password down for future reference.
If you encounter an error while trying to install Linux, it may prompt you to disable RST (Intel Rapid Storage Technology). This typically happens because your PC is currently configured to use RAID mode, which needs to be switched to AHCI mode.
To make this change, you’ll need to access Safe Mode, as it’s the only way to modify the settings. Until you switch to AHCI, you won’t be able to proceed with the installation of your chosen Linux distribution.
How to Disable RST and Switch Windows to AHCI Mode
Follow below steps exactly and ensure you have a full back up before making BIOS or disk-mode changes (via – Ubuntu help.
1. Open Command Prompt as Administrator
2. Enable Safe Mode boot by executing the command: bcdedit /set safeboot minimal
3. Restart the PC and enter the BIOS/UEFI firmware settings (usually by pressing Del, F2, or another key during boot).
4. Locate the SATA configuration option and set it to AHCI (instead of IDE/RAID).
5. Save changes and exit BIOS, then let the computer reboot. It will start in Safe Mode.
6. Open Command Prompt as Administrator again.
7. Disable the Safe Mode boot flag by executing the command: bcdedit /deletevalue safeboot
8. Your Windows will now start normally using the AHCI driver.
Let’s explore the step-by-step process of installing a Linux distribution on an external SSD, ensuring that we cover all necessary preparations, configurations, and troubleshooting tips to make the installation seamless. In this guide, we use Linux Mint for reference.
ALSO READ: Fix Linux Boot Failure Issue on Dual Boot Windows 11 PC
Guide to Install Linux Mint to an External SSD
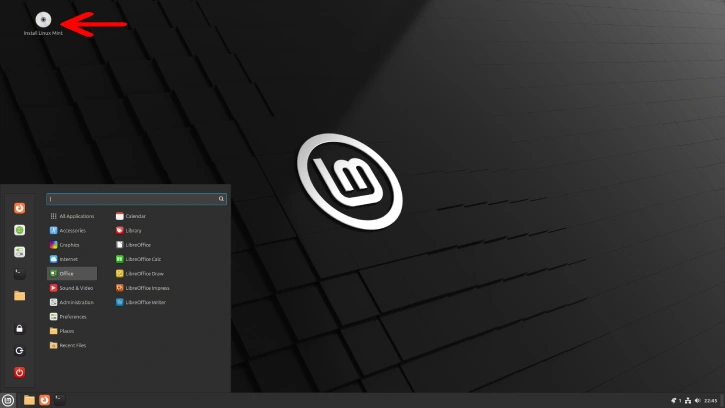
1. Insert the bootable Linux USB into your PC and restart. Ensure the USB is set as the first boot device in your BIOS/UEFI.
2. Boot into the Linux live environment and double-click the Install Linux Mint icon on the desktop.
3. Choose your language and click Continue.
4. (Optional but recommended) Connect to a network if prompted.
5. Select your keyboard layout and choose whether to install multimedia codecs.
6. Important: choose the installation type — select “Something else“.

7. In the partitioning screen, open the “Device for boot loader installation” drop-down and choose your external SSD. Double-click the SSD to edit.
8. If prompted to create a new partition table on the external SSD, confirm. Create a partition and set its mount point to /.
9. Click Install Now.
10. Follow the remaining on-screen prompts to complete the installation. Wait for the process to finish.
11. When installation completes, reboot and remove the USB installer. Boot from the external SSD as needed.
To boot Windows, repeatedly press F12 at startup to open the boot menu and choose Windows Boot Manager. To use Linux, repeat and select your external SSD or Linux entry.
You can use Open Software Manager to install additional apps and Driver Manager to get the latest drivers. For new or free alternatives to paid software, check the Awesome Linux Software list on GitHub for curated recommendations and links.
Conclusion
Linux offers privacy, stability, and customization, with extensive free software and strong community support. It runs well on older hardware, provides powerful developer tools, and lets you control updates and security, making it ideal for privacy-conscious users, developers, and learners.