If your Windows 11 laptop has only 8GB or less RAM and struggles with modern AI tools, video-heavy websites, or frequent freezes, buying new memory or a replacement can be expensive. There’s a practical, low-cost fix that often helps: enable Windows’ built‑in Memory Compression and combine it with a few simple system tweaks.
This post walks through what I did in my Windows 11 laptop, why it helps, and extra steps to keep your system responsive.
Table of Contents
Why Memory Compression Helps
Windows Memory Compression doesn’t add physical RAM, but it reduces the size of idle and unused memory pages so active processes get more usable RAM.
It’s faster than relying solely on virtual memory (pagefile) and can reduce swapping to disk, improving responsiveness on systems with limited RAM.
The trade-off: slightly higher CPU usage to compress/decompress memory, which is usually worth it on modern CPUs.
My Real-World Test (8GB RAM)
Situation: Windows 11 laptop with 8GB RAM, frequent freezes and crashes. Task Manager showed 6.1GB used and only 6.9GB available because 1.1GB was hardware reserved.
Action: I checked Memory Compression status and found it disabled. Using an elevated Terminal, I enabled it and rebooted.
Command to check: Get-MMAgent
Command to enable: Enable-MMAgent -mc
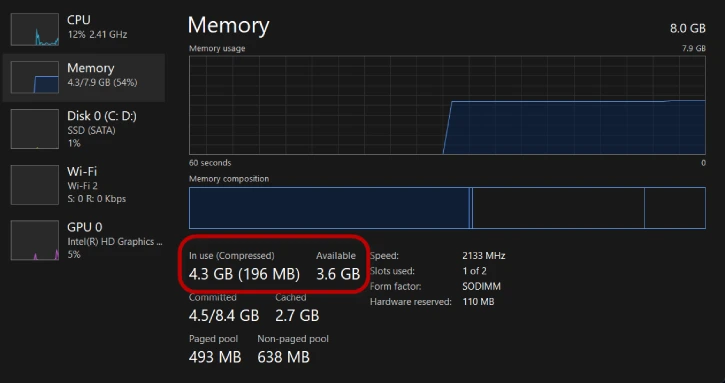
Result: After restart and reopening the same programs and websites, Task Manager showed memory usage dropped from 6.1GB to 4.3GB. The system felt noticeably smoother and quieter.
Step-by-step: Enable Memory Compression (Windows 11)
1. Open Terminal as administrator: Right‑click Start → Terminal (Admin).
2. Check current status: Enter: Get-MMAgent
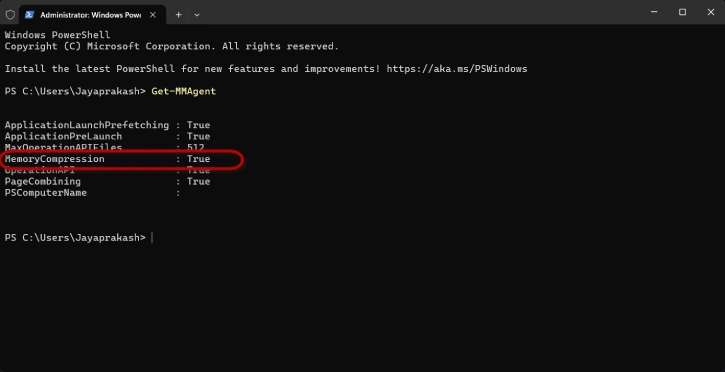
3. If Memory Compression shows False, it’s disabled.
4. Enable memory compression: Enter: Enable-MMAgent -mc
5. Restart your PC.
Reopen your usual apps and check Task Manager > Performance > Memory to confirm reduced usage.
Quick Alternatives and Additional RAM-Saving Tweaks
Disable Startup Apps: Open Task Manager (Ctrl+Shift+Esc) → Startup tab → right‑click unnecessary apps → Disable.
Adjust visual effects: Search “Adjust the appearance and performance of Windows” → choose Adjust for best performance (or customize to keep animations you like).
Manage background apps: Settings → Apps → Installed apps → click the three dots next to an app → Background apps permissions → set to Never for nonessential apps.
Restart SysMain (formerly Superfetch) if it’s misbehaving: Search Services → find SysMain → right‑click → Restart.
(Note: disabling SysMain can help some systems but may reduce performance on others.)
When to Use Memory Compression
Best for systems with limited RAM (4GB–8GB) where buying hardware isn’t an option.
Avoid on very old, low‑power CPUs where an increase in compression-related CPU usage could reduce responsiveness.
ALSO READ: Understanding the VmmemWSA Process and How to Stop it From Consuming Excess RAM in Windows 11
Tips to Maintain Stability
- Keep Windows and drivers up to date.
- Monitor Task Manager for memory hogs and uninstall or limit heavy apps you rarely use.
- Consider lightweight alternatives for web browsing (fewer tabs/extensions) and use ad‑blockers to reduce memory load from video and ads.
Conclusion
Enabling Windows 11 Memory Compression is a quick, free way to reclaim usable RAM and reduce freezes on an 8GB laptop. Combined with startup, visual, and background app tweaks, it can extend the usable life of your current machine without costly upgrades