
If you’re using Windows 11 and find that your system has limited physical RAM, creating virtual memory can significantly improve your multitasking capabilities. Virtual memory, also known as the Page File, acts as an extension of your physical memory, allowing your computer to manage multiple tasks more efficiently when RAM is running low.
By increasing the virtual memory size on your Windows 11 system, you can enhance performance and ensure smoother operation, especially when running resource-intensive applications. Consider adjusting your Page File size to optimize your system’s performance and overall user experience.
In this guide, we will explore the process of increasing virtual memory, also known as the Page File, in Windows 11. Additionally, we will discuss the maximum size that your system can support for this virtual memory configuration.
Contents
What is the Maximum and Minimum Size of Virtual Memory in Windows 11
By default, Windows 11 automatically generates virtual memory based on the physical RAM and system configuration of your computer. However, if you experience lag while using certain applications or games, you may consider increasing the virtual memory, taking into account the size of your RAM.
The minimum and maximum sizes of the virtual memory (Page File) can range from 1.5 times to 4 times the amount of physical memory (RAM) installed on your computer. For instance, if your computer is equipped with 8GB of RAM, the minimum Page File size would be 12GB, while the maximum size could reach up to 32GB.
Step-by-Step Guide: How to Increase Virtual Memory in Windows 11
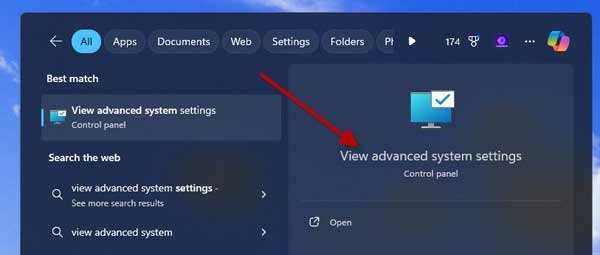
1. In the Windows 11 search bar, enter “View Advanced System” and click on the corresponding result.
2. In the Advanced System Settings window, click on “Settings” under the Performance section.
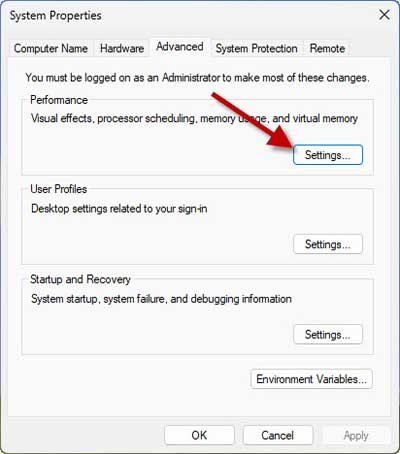
3. In the Performance Settings, select the Advanced tab and click on the “Change” button under the Virtual Memory section.
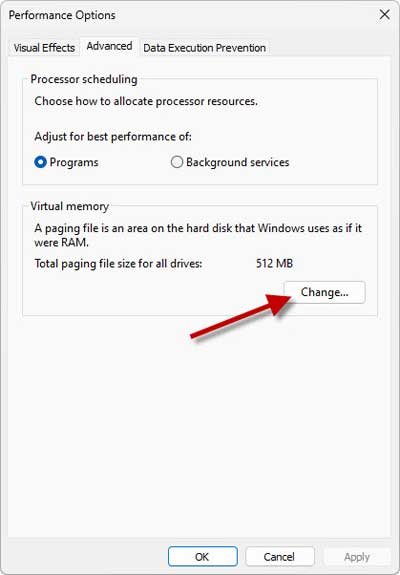
4. Next, uncheck the option “Automatically manage paging file size for all drives.”
5. Now, select the drive where the operating system is installed and choose “Custom Size.”
6. Enter the desired Initial Size and Maximum Size (in MB). (The minimum and maximum sizes of the Page File can be up to 1.5 times and 4 times the RAM that your PC has.)
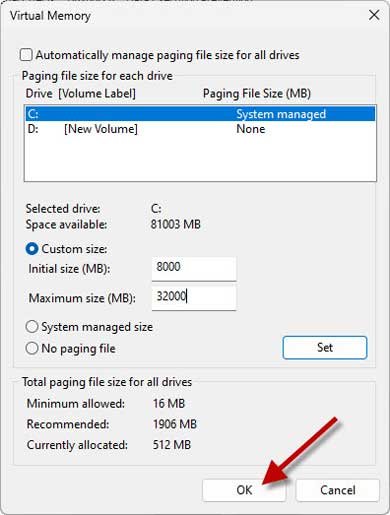
7. Finally, click “Set,” then “OK,” and restart your PC for the changes to take effect.
That’s it! These are the steps to increase the Virtual Memory/Pagefile on your Windows 11 PC. If you experience lag while using your computer or encounter the Blue Screen of Death (BSOD) error messages such as “PAGE_FAULT_IN_NONPAGED_AREA” or “KERNEL_DATA_INPAGE_ERROR,” manually managing the size of the Page file should be your first course of action. By adjusting the Page file settings, you can enhance your system’s performance and stability.