
Drop-down menus in Google Docs make your documents smarter, more interactive, and less prone to errors. Whether you’re building a resume template, project tracker, or internal checklist, drop-down chips let collaborators select from predefined options instead of typing manually.
In this guide, let us learn how to insert drop-downs in Google Docs documents using the Preset drop-downs (Project status and Review status), Custom drop-downs and using the Table templates with built-In drop-downs.
Table of Contents
What Are Drop-Down Chips and Why Should You Use Them?
Drop-down chips are clickable menu items that display a list of predefined values. Instead of asking team members to type information manually (and risk inconsistency or typos), they simply click a drop-down and choose from your curated options.
You can use Google Docs drop-downs for various needs. It works beautifully for:
- Resume templates: Marital status, employment type, or visa sponsorship options
- Project trackers: Status updates like “Not Started,” “In Progress,” “Blocked,” or “Completed”
- Internal workflows: Department names, approval statuses, or priority levels
- Planning documents: Date ranges, project phases, or resource allocation
- Checklists: Yes/No options, risk levels, or completion milestones
The main advantages of drop-downs are faster document completion, fewer data-entry mistakes, and a more polished, professional appearance.
Where to Find Drop-Down Options in Google Docs
Google Docs offers three main ways to add drop-downs:
Method 1: Use Preset Drop-Downs:
Go to Insert > Smart Chips > Drop-down to access two ready-made presets:
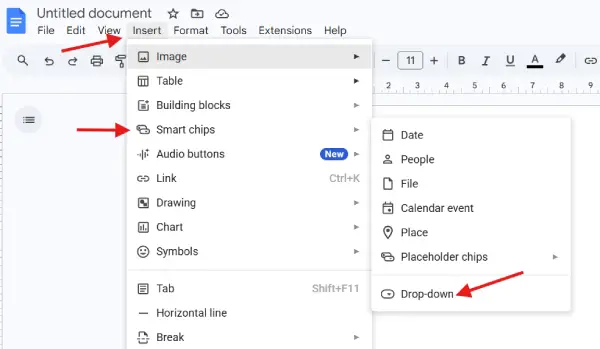
- Project status (Not Started, In Progress, Blocked, Completed)
- Review status (pre-configured review options)
These two are perfect for quick implementation if the preset options match your needs.
Method 2: Create a Custom Drop-Down
Go to Insert > Smart Chips > Drop-down > New drop-down to build your own list from scratch. You control every option, color, and label.
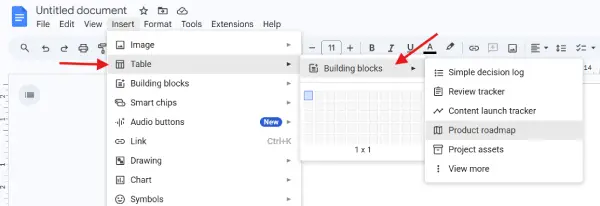
Method 3: Use Table Templates with Built-In Drop-Downs
Go to Insert > Table > Building blocks to explore templates like the Product Roadmap, which come with drop-down chips already integrated. This approach saves time and ensures consistent formatting.
How to Insert a Preset Drop-Down in Google Docs
Let’s start with the simplest and the preset method.
1. Position your cursor where you want the drop-down to appear (e.g., after a task name).
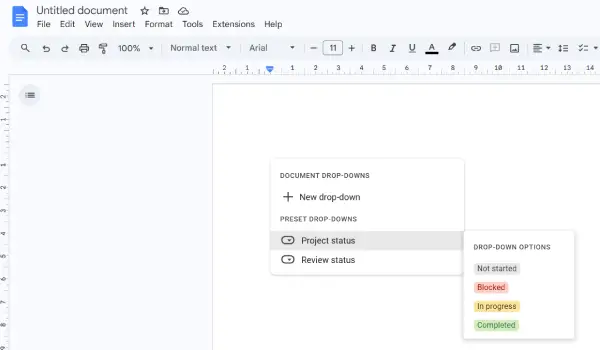
2. Click Insert > Smart Chips > Drop-down > Project status (or Review status, depending on your needs).
3. A drop-down chip appears with preset options like “Not Started,” “In Progress,” “Blocked,” and “Completed.”
4. To customize options: Click the chip and select “Add/Edit options” to rename or remove items.
5. Reuse the drop-down: Copy and paste the chip for other tasks to maintain consistency.
That’s it! You now have a functional drop-down in your Google Docs document.
How to Create a Custom Drop-Down in Google Docs
For more control, build your own drop-down from scratch.
1. First, go to Insert > Table and create a 2×1 table (or larger, depending on your layout).
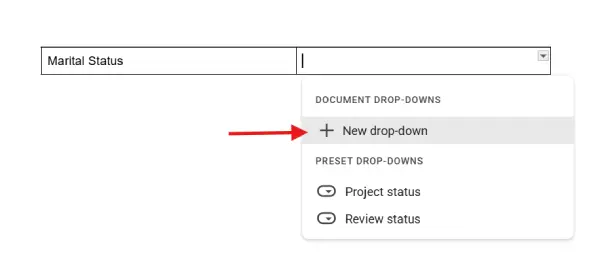
2. Now, aabel the column. In the first cell, type your label (e.g., “Marital Status”).
3. Next, click the second cell and go to Insert > Smart Chips > Drop-down > New drop-down.
4. Replace “Configuration 1” with a descriptive name like “Marital Status.”
5. Add your options:
- Set Option 1 to “Single”
- Set Option 2 to “Married”
- Set other options as required
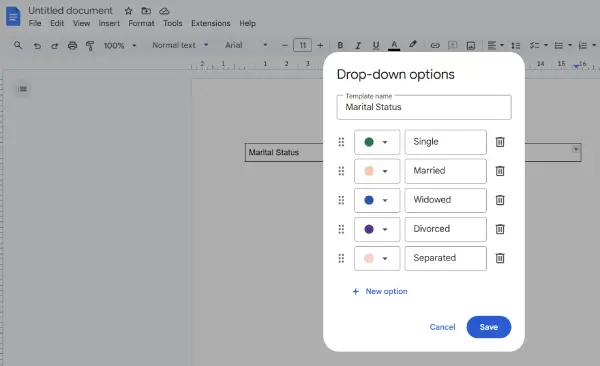
6. Click Save, and the drop-down is ready to use.
7. Copy and paste the drop-down for other rows in your table.
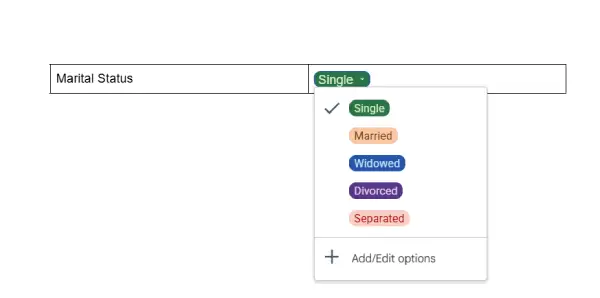
The result of this feature is a a clean, organized custom drop-down perfectly suited to your document’s needs.
ALSO READ: How to Create a Hanging Indent in Word and Google Docs
Using Table Templates with Pre-Built Drop-Downs
Google Docs building blocks include professional templates with drop-downs already in place.
Why Use Template-Based Drop-Downs?
- Time-saving: Drop-downs come pre-configured
- Professional formatting: Templates follow design best practices
- Customizable: You can still edit options, colors, and labels
- Scalable: Great for reports, roadmaps, and planning docs
- Examples include the Product Roadmap template, which includes drop-down chips for status tracking, priority levels, and ownership assignments.
Customizing Your Drop-Down Chips
Once you’ve added a drop-down, Google Docs lets you personalize it further:
- Change text or background color to match your brand or highlight priority levels
- Add or delete options by clicking the chip and selecting “Add/Edit options”
- Update multiple chips at once if you want consistent changes across your document
- Rename options to fit your specific workflow or terminology
Pro Tips for Using Drop-Downs in Google Docs
- Use tables for structure: Organize drop-downs in a table for a cleaner, more professional look
- Keep option lists short: Fewer than 10 options works best for usability
- Use consistent naming: Standardize terminology across all drop-downs (e.g., always use “In Progress” instead of mixing “In Progress” and “Ongoing”)
- Color-code by priority: Use background colors to instantly highlight high-priority or at-risk items
- Share templates: Save drop-down-enabled docs as templates so your team can reuse them
Conclusion
Adding drop-downs to Google Docs is straightforward and transforms how your team works with shared documents. Whether you opt for preset options, build custom lists, or leverage built-in table templates, drop-down chips keep your documents consistent, interactive, and error-free. Start with a preset drop-down if you’re new to the feature, then experiment with custom lists and templates as you become more comfortable. Once you integrate drop-downs into your workflow, you’ll wonder how you ever worked without them.
Ready to make your Google Docs smarter? Insert your first drop-down today and experience the difference.