
Watermarks can be useful for marking documents as drafts or confidential, but they can also clutter your pages when you’re ready to finalize and share your work. Whether it is a text watermark or picture watermark, removing it from a Word document is quick and straightforward. In just a few clicks, you can have a clean, watermark-free document ready to go.
Whether you’re preparing a document for distribution, cleaning up an old file, printing a document, or simply want a cleaner appearance, this guide will walk you through the entire process. You’ll have your document watermark-free in no time.
Table of Contents
How to Remove a Watermark from Word Documents (Beginner’s Guide)
Step 1: Open the Word document that contains the watermark you want to remove.
- Double-check your document to ensure it’s the one that needs editing, especially if you’re managing multiple versions.
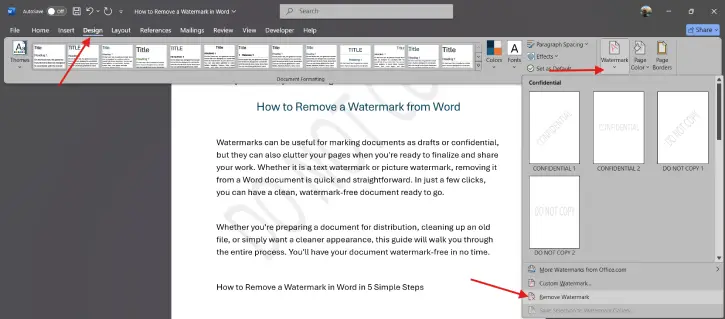
Step 2: Click on the “Design” tab at the top of your screen.
- If you can’t see the Design tab, make sure you’re not in “Read Mode.” You’ll need to be in editing mode to access these options.
Step 3: Within the “Design” tab, find and click on the “Watermark” option.
- This will open a dropdown menu displaying different watermark options, including the “Remove Watermark” option.
Step 4: From the dropdown menu, click “Remove Watermark.”
- This will instantly remove the watermark from every page of your document.
Step 5: After removing the watermark, save your document to ensure the changes are permanently applied.
- Use shortcut Ctrl+S (Windows) or Command+S (Mac) to quickly save your document.
Pro Tips for Removing Watermarks Successfully
- Double-check before removing: Ensure you’re removing the correct watermark from the right document.
- Check your Word version: Some older versions of Word have the watermark option under “Page Layout” instead of “Design.”
- Preview after removal: Always review your document after removing the watermark to ensure everything looks correct.
- Use “Save As” for backups: If you want to keep the original watermarked version, use “Save As” to create a separate copy.
- Exit Read Mode if needed: If the “Design” tab isn’t visible, you may be in Read Mode. Switch to Edit Mode to access watermark settings.
Why Remove Watermarks?
Watermarks serve different purposes depending on your needs. You might want to remove one because:
- Professional distribution: Removing draft or confidential watermarks makes documents look polished and ready for final sharing
- Cleaner appearance: Watermarks can distract from your content, so removing them improves readability
- Reusing templates: You may inherit a document with an old watermark you want to replace
- Printing clarity: Some watermarks can affect how documents print, especially in black and white
Conclusion
Removing a watermark from Word is one of the easiest document edits you can make. With these five simple steps, you’ll have a professional-looking, watermark-free document in seconds. Whether you’re preparing materials for a presentation, finalizing a report, or simply cleaning up old files, you now have all the knowledge you need.
The next time you need to remove a watermark, you can do it confidently without wasting time searching for instructions.