

Windows 11 has a Disk Cleanup utility, but accessing it is a big task, as its location is within multiple settings. Often you need to navigate through several clicks or use the Windows Search feature to find the built-in cleanup tool. However, you can create a desktop shortcut for it to run Disk Cleanup directly for a specific drive on your computer.
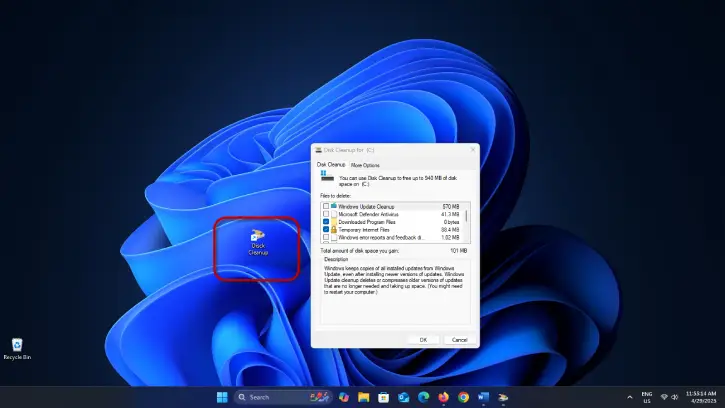
FYI, Windows 11 has Storage Sense feature that automatically deletes unnecessary files at fixed intervals. While this helps keep your system tidy, it doesn’t replace the need for the built-in Disk Cleanup utility. To effectively remove unwanted files from specific drives, you still need to utilize Disk Cleanup.
How to Create Desktop Shortcut for Disk Cleanup Utility on Windows 11
1. Right-click on your desktop, select “New,” and then click on “Shortcut.”
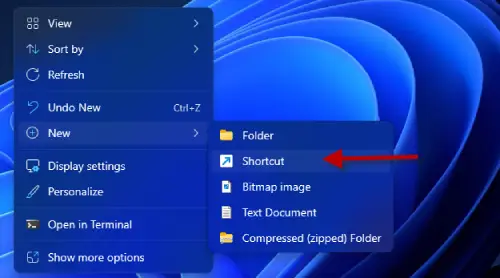
2. In the location field, type cleanmgr.exe /d C: (choose a different drive letter if your target drive is not C).
3. Click “Next” and give the shortcut a name (for example, “Disk Cleanup C Drive”).
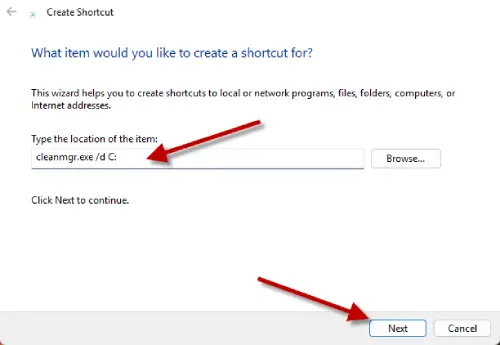
4. Finally, click “Finish,” and an icon will appear with the name you chose.
5. Click the new shortcut to open Disk Cleanup.
Note: If you prefer not to create a shortcut, you can access the Disk Cleanup tool in Windows 11 by navigating to Settings > System > Storage > Temporary files.
ALSO READ: How to Safely Clean WinSxS on Windows to Reclaim SSD Space
You can use the Windows Disk Cleanup tool to remove temporary system files, temporary internet files, delivery optimization files, residual Windows update files, thumbnails, driver packages, Recycle Bin files, Microsoft Defender antivirus files, and more with just a click. This means you don’t need a third-party cleanup tool to keep your system fast and secure.
Conclusion:
By regularly cleaning up temporary files, also enabling Storage Sense feature, you can enhance your computer’s speed and maintain its overall health without the need for third-party software. By combining both features, you can ensure your Windows 11system remains optimized and free of clutter, enhancing overall performance.

