
Apple launched a new app for Windows, called Devices app, to help you manage sync, backup, restore, and update your iPhone, iPad, and iPod devices from your Windows 11 computer. Available on Microsoft Store, you can use the app to keep your iPhone updated with the latest iOS version is essential to ensure optimal performance and security.
While many users are accustomed to updating their iPhones using a Mac computer, it is also possible to update your iPhone from a Windows 11 PC using the Apple Devices app. In this guide, we will walk you through the steps to install an iOS update on your iPhone from a Windows 11 computer.
Table of Contents
Step 1: Download and Install the Apple Devices App
The first step is to download and install the Apple Devices app on your Windows 11 computer. To do this, follow these steps:
- Open the Microsoft Store on your Windows 11 PC.
- Search for “Apple Devices” in the search bar.
- Select the “Apple Devices” app from the search results, or download it from this link.
- Click on the “Install” button to download and install the app.
Step 2: Connect Your iPhone to Windows 11
Once you have installed the Apple Devices app, you will need to connect your iPhone to your Windows 11 computer. Follow these steps to establish the connection:
- Launch the Apple Devices app from the Start menu.
- Connect your iPhone to your Windows 11 PC using a Lightning cable.
- Unlock your iPhone and tap “Trust” when prompted to trust the computer.
- Wait for the Apple Devices app to detect your iPhone.
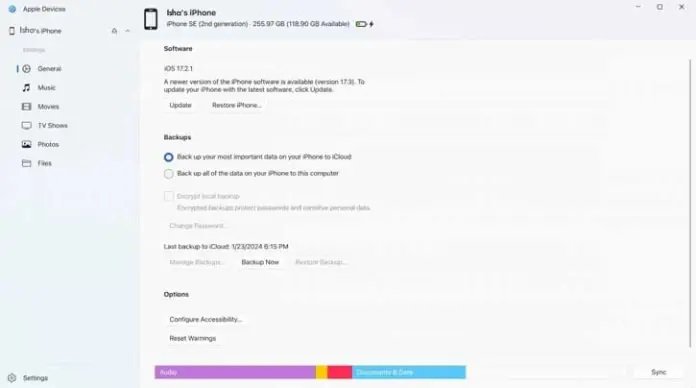
Step 3: Check for iOS Updates
Once your iPhone is connected to Windows 11 through the Apple Devices app, you can check for available iOS updates. Here’s how:
- In the Apple Devices app, click on the “Device” tab.
- Scroll down and click on the “Software Update” option.
- The Apple Devices app will check for available iOS updates for your iPhone.
- If an update is available, click on the “Download and Install” button.
Step 4: Install the iOS Update
After downloading the iOS update, you can proceed to install it on your iPhone. Follow these steps:
- In the Apple Devices app, click on the “Device” tab.
- Scroll down and click on the “Software Update” option.
- Click on the “Install Now” button to begin the installation process.
- Follow the on-screen instructions to complete the installation.
Step 5: Keep Your iPhone Connected
During the iOS update installation process, it is important to keep your iPhone connected to your Windows 11 PC. Do not disconnect the Lightning cable until the update is fully installed.
Step 6: Restart Your iPhone
Once the iOS update installation is complete, it is recommended to restart your iPhone. This will ensure that all changes are applied and your device is running on the latest iOS version.
Conclusion
Updating your iPhone to the latest iOS version is crucial for performance and security enhancements. With the Apple Devices app on Windows 11, you can easily check for and install iOS updates on your iPhone. Follow the steps outlined in this guide to keep your iPhone up to date and enjoy the latest features and improvements.