

Windows 11 includes a built-in VPN client, so you don’t need to install a separate VPN app on your computer to hide your IP address and location. If you already have a paid VPN service or want to use a free one, you can simply use Windows’ built-in VPN client.
In this guide, you’ll learn how to enable and use Windows 11’s built-in VPN on your PC. The process is straightforward: open Settings > Network & Internet > VPN, then enter the server name, choose a VPN protocol, and provide your sign-in details.
The main advantages of this setup are that you don’t need to run an additional background running app on your PC, and you can quickly turn the VPN on or off directly from the Windows Quick Settings panel. However, it also has a few drawbacks, including the lack of a kill switch and limited protocol support.
Windows 11 Built-in VPN Protocols:
- IKEv2: Fast and reliable, especially when switching between networks. Usually the best choice.
- SSTP: Developed by Microsoft and uses HTTPS, helping it work through restrictive firewalls.
- L2TP/IPsec: An older, widely supported option that uses encryption with either a certificate or shared key.
- PPTP: Fast but outdated and insecure. Avoid it unless there’s no alternative.
- Automatic: Lets Windows choose a supported protocol for you.
Note: Windows 11’s built-in VPN doesn’t support the latest WireGuard or OpenVPN.
How to Setup and Use Windows 11’s Built-In VPN Client
If you already subscribe to a VPN service, check whether it supports the protocol mentioned above. If it does, sign in to your account and obtain the server name, username, and password. You can then enter these details in Windows 11’s VPN settings.
If you’d prefer to use a free VPN, follow the instructions below. This guide uses VPN Gate, a service operated by the University of Tsukuba in Japan. It supports SSTP, which works well with the built-in Windows VPN client.
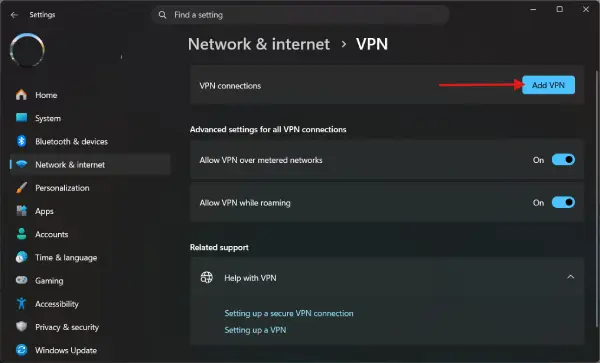
1. Open Settings and go to Network & internet > VPN.
2. Click Add VPN.
3. In the Connection name field, enter any name you want for the VPN connection.
3. Visit the VPN Gate website (vpngate.net) and copy a server hostname from the list of available servers.
4. Paste the hostname into the Server name or address field.
5. Set VPN type to Secure Socket Tunneling Protocol (SSTP).
6. Enter vpn as both the username and password.
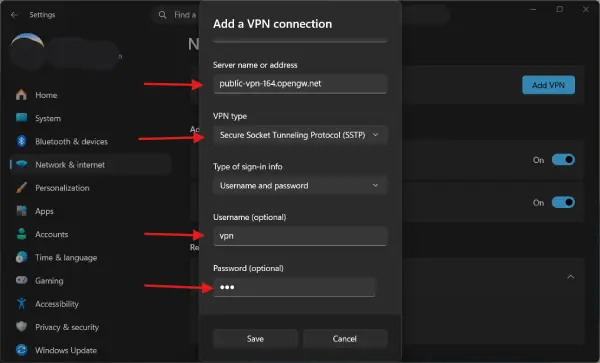
7. Click Save.
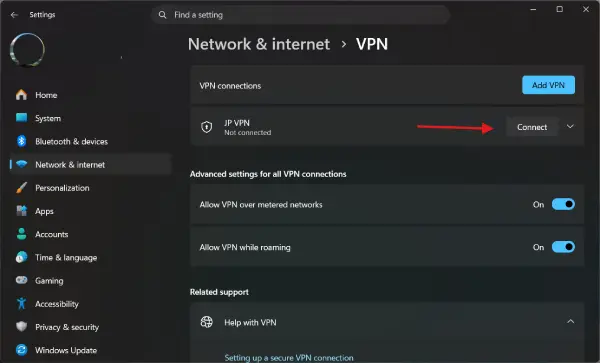
8. Your VPN connection will now appear in the Windows 11 VPN settings. Click Connect to activate it.
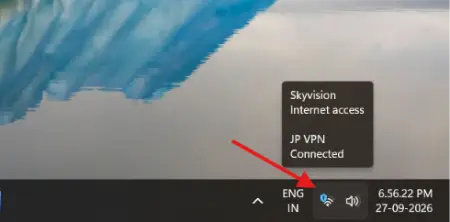
Note: Once connected, you can also enable or disable the VPN from the Quick Settings panel.
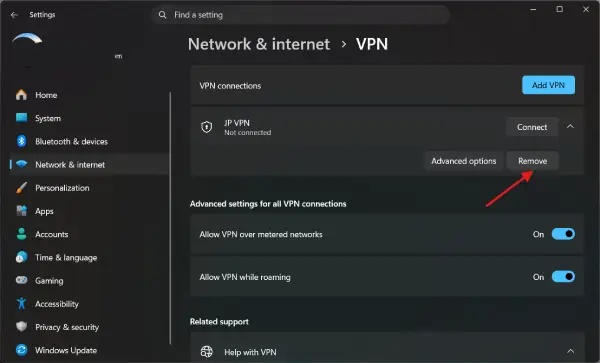
To remove the VPN connection, disconnect from it first, then click Remove.
Advantages and Disadvantages
Windows 11 built-in VPN client is cleaner and simpler: no extra background running app, no vendor telemetry, and no subscription if you use the free option. It works well for basic use and switch smoothly between Wi Fi and hotspot.
However, it lacks the most important Kill switch function, obfuscation, server switching, and leak protection. Also, Windows 11 VPN doesn’t support the latest WireGuard or OpenVPN.
Final Thought:
Windows 11’s built-in VPN is a simple, convenient option for basic secure connections, especially if your provider supports compatible protocols or you use a free service like VPN Gate. It’s easy to set up, but lacks advanced privacy and security features.

