

Text wrapping is one of the most powerful formatting tools in Microsoft Word, and fortunately, it’s simple to use. To wrap text around a picture or object, simply click on the image, locate the Layout Options icon, and select your preferred wrapping style. This straightforward process helps keep your document visually balanced, organized, and easy to read.
Why Text Wrapping Matters in Microsoft Word
When you wrap text around images or objects, your content flows naturally around your visuals instead of pushing them to separate lines. This technique transforms a cluttered document into a polished, publication-ready piece that’s easy on the eyes and engaging to read.
Whether you’re creating a newsletter, report, or marketing document, proper text wrapping ensures your images integrate seamlessly with your content, keeping readers focused on your message rather than distracted by awkward spacing or misaligned elements.
How to Wrap Text in Microsoft Word: Step-by-Step Instructions
Step 1: Open a document that includes images or object. Click the image to select it (you’ll see small squares around the edges of your image)
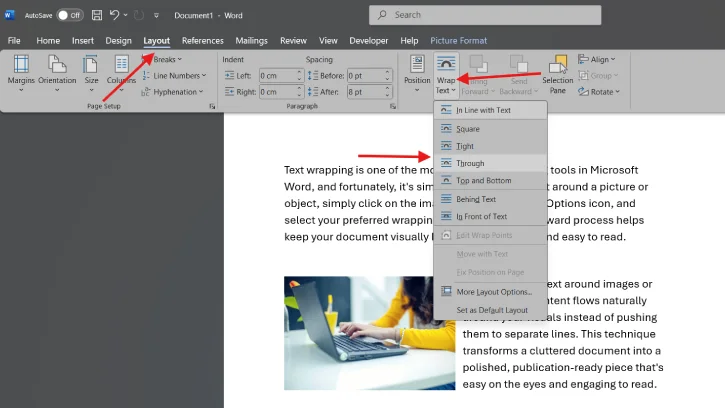
Step 2: Select the Layout tab and click the “Wrap Text” dropdown menu to see all available text wrapping options for your document.
Step 3: The “wrap Text” option displays several wrapping styles. Select the style that best matches your document layout and design vision.
Here are the most commonly used options:
- Square: Text forms a box around your image, leaving space on all sides. Best for most general layouts.
- Tight: Text hugs the contours of your image more closely, ideal for detailed or irregularly shaped images.
- Behind Text: Your image sits behind the text, perfect for watermarks or subtle background images.
- In Front of Text: The image floats above the text, useful for callout boxes or emphasized graphics.
- Top and Bottom: Text appears only above and below the image, not to the sides.
[Each option creates a different visual effect, so choose based on how you want your content to flow around the image.]
Step 4: After applying a wrapping style, adjust your image’s position and size to achieve the perfect balance with your text.
Step 5: Now, check review and print preview your entire document to ensure the text wrapping looks exactly as intended.
[This step is crucial because on-screen formatting sometimes differs slightly from printed output.]
Pro Tips for Perfect Text Wrapping
- Experiment with different wrapping styles before settling on one, as what works for a simple rectangular image might not work as well for a complex graphic with irregular edges.
- Use “Tight” wrapping for detailed images to create a more polished, custom look that follows the exact contours of your image rather than creating a uniform box around it.
- Avoid awkward text breaks by strategically positioning your images at natural paragraph breaks or section dividers to maintain readability and prevent confusing line breaks.
- Choose “Behind Text” for watermarks or subtle background images that shouldn’t interrupt the flow of your main content, such as company logos or decorative elements.
- Check print preview regularly to verify how your wrapped text will look on paper, since digital screens and printed pages don’t always display formatting identically.
Conclusion
Text wrapping in Microsoft Word is a simple skill that dramatically improves your document’s appearance and professionalism. By following these steps and experimenting with different wrapping styles, you’ll be able to create polished, visually appealing documents that keep readers engaged. Whether you’re working on a business report, academic paper, or creative project, mastering text wrapping gives you the tools to present your content in the most professional way possible.

