
Losing a Word document that wasn’t saved is one of the most frustrating experiences you can have while working on your computer. Whether your Office application crashed unexpectedly, you accidentally closed the file, or your device lost power, the panic that follows is real. Fortunately, Microsoft Word has built-in recovery features to help you recover unsaved documents.
There are 5 quick methods to recover unsaved documents in Word. With the right method, you can often recover most or all of your unsaved Word document. In this guide, we’ll walk you through five proven methods to recover your lost Word documents, plus practical tips to prevent this from happening again.
Table of Contents
How to Recover Unsaved Word Documents
Method 1: Check the Document Recovery Pane
When you open Word after an unexpected closure, the application often automatically displays a “Document Recovery” pane on the left side of your screen. This is Word’s built-in safety net for unsaved work. Here’s what to do:
• Launch Microsoft Word
• Look for the Document Recovery pane (usually on the left)
• Review the listed documents and select the one you need
• Click to open it
• Save the recovered document immediately to a permanent location on your computer
This method works best when Word has crashed or closed unexpectedly, as it triggers automatic recovery protocols.
Method 2: Use the Recover Unsaved Documents Feature
Microsoft Word has a dedicated recovery tool buried in the File menu that gives you direct access to AutoRecover files. (The unsaved files can be find at C:\Users\Username\AppData\Roaming\Microsoft\Word). Follow these steps:
• Open Microsoft Word
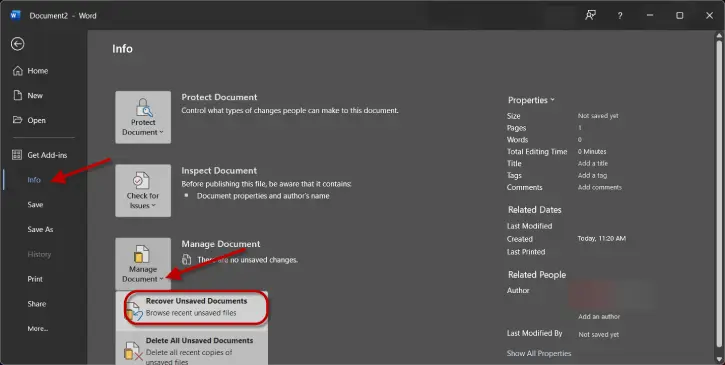
• Click File in the top-left corner
• Select Info
• Click Manage Document (or Manage Your Content depending on your Word version)
• Choose Recover Unsaved Documents
• Browse through the folder to find your document by date or filename
• Double-click the file to preview it
• Save it to your desired location once you’ve confirmed it’s the right version
This method is particularly useful if the Document Recovery pane didn’t appear automatically.
Method 3: Search for Temporary Files
Windows stores temporary files in specific folders, and Word documents sometimes end up there when they’re not saved. You can manually search for these files using Windows Search. Here’s how:
• Open Windows Search (press Windows Key + S)
• Type .tmp in the search bar to find temporary files
• Look through the results and note the file dates – focus on files created around the time you lost your document
• Right-click suspicious files and select Open With > Microsoft Word
• Check if the content matches your lost document
• Save it with a proper filename once you’ve verified it’s correct
This method requires a bit of detective work, but it can uncover files that other recovery methods miss.
Method 4: Check Recent Documents
Sometimes your unsaved document is hiding in plain sight. Word’s Recent Documents list can display files you’ve been working on, even if they weren’t formally saved. To access this feature:
• Open Microsoft Word
• Click File in the menu
• Select Open
• Look for Recent Documents or Recent on the right side
• Browse through the list and look for your document
• Click any file you suspect might contain your work
• Review the content to confirm it’s what you need
• Save it immediately if it matches
This is one of the quickest methods, so it’s worth trying first.
Method 5: Adjust AutoRecover Settings for Future Protection
While this won’t recover your current lost document, enabling and configuring AutoRecover prevents future loss. AutoRecover automatically saves versions of your work at regular intervals. To enable AutoRecover:
• Open Microsoft Word
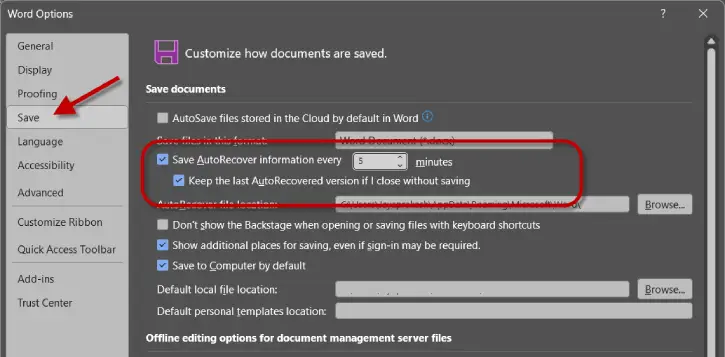
• Click File > Options
• Select Save from the left menu
• Check the box for Save AutoRecover information every [X] minutes
• Set the interval to 1–5 minutes for maximum protection
• Check the box for Keep the last AutoRecovered version if I close without saving
• Click OK
With these settings enabled, Word will save backup versions of your work automatically, making future recovery much easier.
Prevention Tips: Never Lose a Document Again
The best recovery is one you never need. Here are five essential practices to protect your work:
Enable Cloud Storage Integration: Use OneDrive, Google Drive, or Dropbox to automatically sync your Word documents. Cloud storage provides version history and recovery options even if your local files are lost.
Save Frequently: Get in the habit of pressing Ctrl+S (or Command+S on Mac) every few minutes. Making saving automatic through muscle memory is one of the simplest protections available.
Create Backups of Important Documents: Regularly copy important files to external drives or cloud storage. This adds an extra layer of protection for critical work.
Use Descriptive Filenames: Give your documents clear, descriptive names with dates (e.g., “Project_Proposal_April2026_v2.docx”). This makes recovery and version tracking much easier if you have multiple files.
Familiarize Yourself with Recovery Tools Before You Need Them: Spend 10 minutes exploring Word’s recovery features now, while you’re not in crisis mode. Knowing where these tools are located will save you time and stress when disaster strikes.
Conclusion
Unsaved Word documents aren’t always gone forever. By following these five recovery methods – checking the Document Recovery pane, using the Recover Unsaved Documents feature, searching for temporary files, reviewing Recent Documents, and adjusting AutoRecover settings – you have multiple chances to get your work back.
The key is to act quickly after realizing your document is missing, and then implement preventive measures immediately so you never face this situation again. Your future self will thank you for taking these steps today.