
Organizing a complex document can be challenging, especially when you’re working with multiple images, shapes, or text boxes. However, the grouping feature in Microsoft Word makes this task easy. It allows you to combine multiple objects into a single unit that moves and resizes together seamlessly.
Whether you’re creating professional layouts, designing newsletters, or building infographics in Microsoft Word, mastering the grouping function will significantly improve your workflow and document management efficiency. Here’s a simple guide for beginners on how to group objects in Word.
Table of Contents
What Is Grouping in Microsoft Word?
Grouping is a Word feature that allows you to select multiple objects and bind them together so they function as one unified unit. Once grouped, any action you perform – moving, resizing, rotating, or formatting – applies to all objects in the group simultaneously. This eliminates the frustration of accidentally moving individual elements out of alignment and saves considerable time when managing complex designs.
There are two methods to group and ungroup objects in Microsoft Word: using the context menu or Word’s Ribbon menu.
How to Group Objects in Microsoft Word (2 Methods)
Method 1:
Step 1: First, select all objects you want to group. To do so, hold down the Ctrl key (or Cmd on Mac) and click each object in your document you want to combine.
- This selection method allows you to pick multiple non-adjacent items across your document.
Step 2: Now, release the Ctrl/Cmd key, right-click on one of your selected objects to bring up the context menu.
- Right-click directly on one of the selected objects, not on empty space in the document.
Step 3: Hover over the “Group” option in the context menu, then click “Group.”
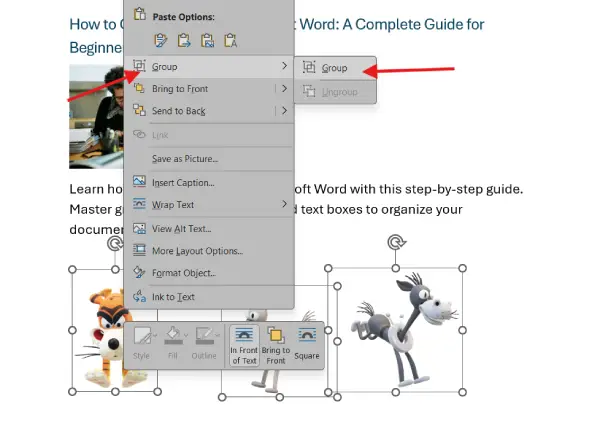
- Word will immediately treat all selected objects as a single unit, allowing them to move and resize together.
Step 4: Finally save your document, using the Ctrl + S shortcut (or Cmd+S on Mac) or clicking the Save button.
Method 2:
If you prefer using the Word’s Ribbon interface instead of right-clicking, follow the steps below.
1. First select all objects you want to group as described in method 1.
2. Now, go to the “Format” tab on the top menu, then click the “Group” button.
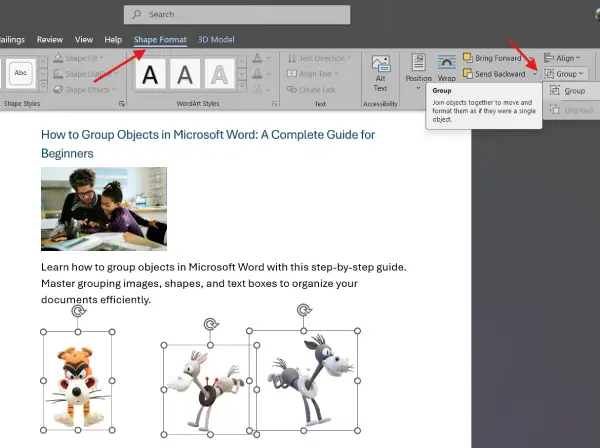
Note: The Format tab appears automatically when you have objects selected in your document.
3. This method accomplishes the same result and may feel more intuitive for some users.
4. Save your work immediately after grouping to preserve your changes. Use Ctrl+S (or Cmd+S on Mac) or navigate to File > Save to ensure your grouping adjustments are permanently stored.
Note: To ungroup objects, select the object and select “Ungroup” from the right context menu or Ribbon menu.
Best Practices for Grouping in Word
- Group related elements together for better organization and easier navigation
- Save frequently after grouping to prevent losing your work
- Use descriptive names for groups if you’re working with complex documents (available through the Selection Pane)
- Test your layout before finalizing to ensure grouped objects display correctly
- Create backups of documents with significant grouping before making major revisions
Managing Grouped Items (Ungrouping, Moving, Resizing and Editing)
Moving Grouped Items:
Once objects are grouped, click anywhere on the group and drag to move all items together. The entire group maintains its internal alignment, so elements stay perfectly positioned relative to one another.
Resizing Grouped Objects:
Click and drag the corner handles of the group to resize all objects proportionally. This keeps your design balanced and prevents distortion.
Ungrouping Objects:
If you need to work with individual elements again, right-click the group, hover over “Group,” then select “Ungroup.” This separates all objects back to their individual state.
Editing Grouped Objects:
To modify a single object within a group without ungrouping, click the group once to select it, then click again on the specific object you want to edit. This enters “edit mode” for that object.
Why You Should Use Grouping in Word
Improved Organization: Grouped objects stay perfectly aligned, maintaining your design’s integrity as you move elements across your document. This is especially valuable when creating headers, footers, or decorative layouts.
Faster Workflow: Instead of adjusting each object individually, grouped items move and resize as one, dramatically reducing the time spent on document formatting and layout adjustments.
Better Design Control: Grouping prevents accidental displacement of design elements, ensuring your carefully crafted layouts remain intact throughout the editing process.
Simplified Editing: When you need to make changes, you can modify the entire group at once rather than applying the same formatting to each element separately.
Conclusion
Grouping objects in Microsoft Word is an essential skill for anyone creating professional documents, layouts, or designs. By following these straightforward steps – selecting objects, right-clicking, and choosing “Group” – you can organize your document more efficiently and maintain perfect alignment across multiple elements. Whether you’re a beginner or an experienced Word user, mastering this feature will streamline your workflow and help you produce polished, professional results every time.
Start using grouping in your next Word document and experience how much easier document management becomes when objects work together as a unified whole.