
Removing password from a encrypted Excel file is a simple process when you have the correct password. In this guide, let us learn how to unencrypt a password-protected Excel spreadsheet, allowing you to regain full access to your document.
Protecting an Excel spreadsheet with a password ensures your data isn’t accessed by unauthorized persons. Once you create a spreadsheet, go to File tab > Info > Protect Workbook > Encrypt with Password > enter your password and click OK to encrypt your file. The same process can be used to remove the password from an Excel file.
Below is the step-by-step instruction to remove password from a password protected Excel file. This will ensure the file is accessible without any security restrictions.
Table of Contents
Step-by-Step Instructions to Remove Password From Excel File
Step 1: Open Your Password-Protected Excel File
Start by opening the Excel file you want to unencrypt. When prompted, enter the correct password to access the spreadsheet. If you’ve forgotten the password, you’ll need to recover it through other means before continuing.
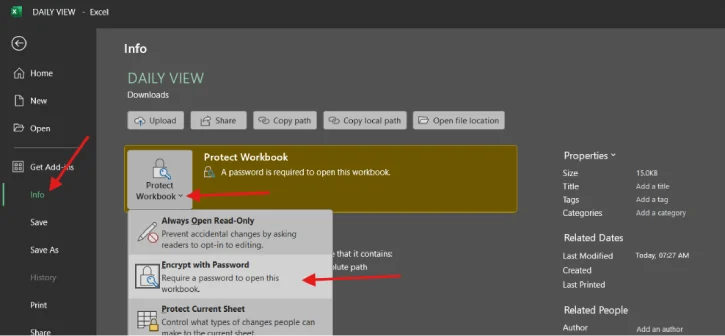
Step 2: Access the File Menu
Once the file is open, look at the top left corner of your Excel window and click on the “File” menu. This opens a dropdown panel with various file management options.
Step 3: Navigate to the Info Tab
Inside the File menu, select the “Info” tab. This section displays all the security settings and protection details for your workbook, including encryption status.
Step 4: Find and Click “Protect Workbook”
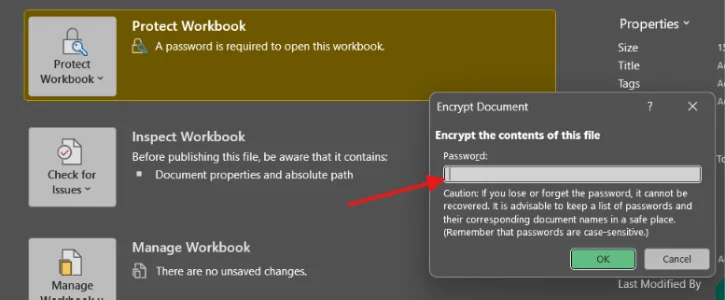
In the Info tab, locate the “Protect Workbook” button and click on it. A dropdown menu will appear. From this menu, select “Encrypt with Password.” This will display the current password status and give you the option to modify it.
Step 5: Remove the Password
Here’s the key part: delete the existing password from the password field and leave it blank. This action removes the encryption entirely. Once you’ve cleared the field, click “OK” to confirm your changes. The file will now show an unprotected status.
Step 6: Save Your Changes
Don’t forget this final step! Click the “Save” button (or use Ctrl+S) to apply your changes permanently. Without saving, your modifications won’t take effect, and the file will remain encrypted.
ALSO READ: You’re Using Excel Wrong: Learn These 5 Paste Special Features
What Happens After Removal?
Once you’ve completed these steps, your Excel file will no longer be encrypted. This means anyone with access to the file can open it without entering a password. The spreadsheet is now in its unprotected state, making it easier to share or collaborate on with others.
Pro Tips for Working with Excel Security
1. Know the Difference Between Workbook and Sheet Protection
Excel allows you to protect either the entire workbook or individual sheets. The steps above remove workbook-level encryption. If your sheets are individually protected, you may need to use a different method to unprotect them.
2. Protect Important Files Appropriately
If you’re removing encryption from a sensitive file, consider re-encrypting it with a new password afterward to maintain security. Use a password manager to store complex passwords safely.
3. Back Up Before Making Changes
Always create a backup copy of your Excel file before removing encryption. This protects you in case something goes wrong during the process or if you change your mind.
4. Use Strong Passwords Going Forward
If you decide to re-encrypt your file later, use a combination of uppercase and lowercase letters, numbers, and special characters to create a strong password that’s difficult to guess.
5. Document Your Security Changes
Keep a record of which files you’ve unencrypted and when. This helps prevent confusion if you’re managing multiple versions of the same spreadsheet.
Conclusion
Removing password protection from an Excel file is a simple process that takes just six steps and a few minutes of your time. Whether you’re trying to regain access to a file you created or streamlining your workflow, this guide has provided you with everything you need to decrypt your spreadsheets safely. Remember to always keep backups of important files and consider re-encrypting sensitive data once you’ve made the changes you need. With these tools and tips, you’re now equipped to manage Excel security with confidence.