
If you aren’t getting the maximum internet speed provided by your ISP on your Windows 11 PC over Wi-Fi, switching to the 5GHz or 6GHz band can be beneficial. For those with a dual-band router configured correctly, here’s how to force your Windows PC to use the 5GHz band, ensuring faster speeds.
The most common issues of a home Wi-Fi network are less speed and higher latency. These issues often come up from incorrect router configuration and improper PC settings.
Presently, Wi-Fi networks operates across three bands: 2.4GHz, 5GHz, and the most recent 6GHz. A higher frequency, such as 5GHz ensures faster speed and lower latency, but it will impact the range.
Most of Windows 11 devices are compatible with the 5GHz Wi-Fi band. However, they are typically set to ‘auto-mode’, which allows them to connect to either the 2.4GHz or 5GHz bands.
Given that the 2.4GHz band usually provides a more robust signal, your computer will often default to this band. But 2.4GHz band can only deliver below 100MB/s (in real-world).
Table of Contents
How to Force Your Windows 11 PC to Receive 5GHz Wi-Fi Band?
Pre-requisites before switching to 5GHz band:
- Your Windows PC should be near to the router to get good signal strength, otherwise you will not get benefits of 5GHz.
- Place your router near to your PC to get maximum signal or use a good Mesh system.
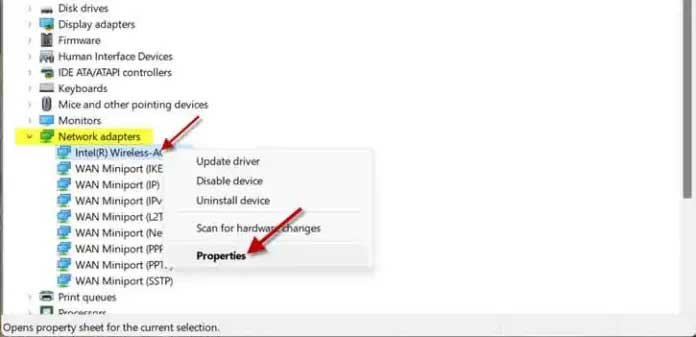
1. Right-click the Start button on your Windows 11 PC and select Device Manager.
2. In Device Manager, expand the Network adapters menu.
3. Right-click the Wi-Fi device and choose Properties.
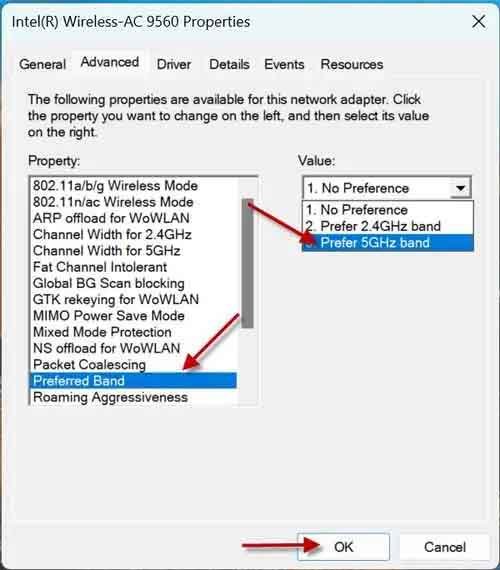
4. Next, select the Advanced tab and click the Preferred Band option.
5. Click the Value drop-down menu and select the Prefer 5GHz band option.
6. Click OK to save the changes and close Device Manager.
Important: On some PCs, you may need to choose the 5GHz compatible standard, such as 802.11ax (preferred), 802.11ac, or 802.11n in the Wireless mode option.
What is Wi-Fi 6E or 6 GHz Wi-Fi Band (Pros & Cons)
Wi-Fi 6E is a new Wi-Fi standard that operates in the 6GHz frequency band. Unlike its predecessors, it has access to a wider spectrum, which translates to faster speeds and less signal interference.
Technical Speeds: Technically, Wi-Fi 6E can deliver speeds of up to 9.6 GB/s. However, in real-world scenarios, you can expect speeds to be around 1 Gbps.
Considerations for Wi-Fi 6E Usage:
Limited Device Support: Since Wi-Fi 6E is relatively new, not all Windows PCs support this band. Check your device specifications to see if it’s compatible.
Short Range: Wi-Fi 6E has a shorter range compared to other Wi-Fi bands. For optimal performance, it’s recommended to use Wi-Fi 6E when you’re in the same room as the router broadcasting the signal or use a good Mesh system.
How to Check Your PC is Connected to 5/6GHz Band?
- To check if your PC is connected to the 5GHz band, open the Network & Internet menu.
- Next, click on the Wi-Fi properties and look for the network band. It should be 5GHz.
Why Your PC isn’t Using 5GHz Band Signal?
Even after making above changes your PC isn’t using the 5GHz network, it might be due to reasons.
Your router might not be compatible with the 5GHz band or may be transmitting at a higher frequency, which could result in it being out of range. Additionally, some routers have distinct network names for the 2.4GHz and 5GHz bands.
To address this, consider connecting to a different network in your settings. Often, the network name will remain the same, but with an added ‘5’ or ‘5G’ at the end.