

Data security, malware protection, prevention of data theft, stop unauthorized device driver installation, improved network security, etc. are the main advantages of disabling USB port on a computer. If you are using your laptop in public places like libraries, you may want to disable USB port for security reasons.
There are five ways to disable USB ports on computers and laptops that run on Windows 11. Using the Device Manager, using the Registry Editor, via Group Policy Editor, Command Prompt and using the BIOS or UEFI. Below is a guide, for each method. You can pick the method that fits your needs.
Five Methods to Disable USB Ports on Windows 11
Method 1: Using Device Manager
Disabling USB port via Device Manager is the easiest method in Windows 11. Here are the steps to follow.
1. Type Device Manager in Windows 11 search field and click the Device Manager shown in the search result to open it.
2. On the Device Manager, scroll down and expand the Universal Serial Bus Controllers list.
3. Right-click on the USB Port and select the option Disable device.
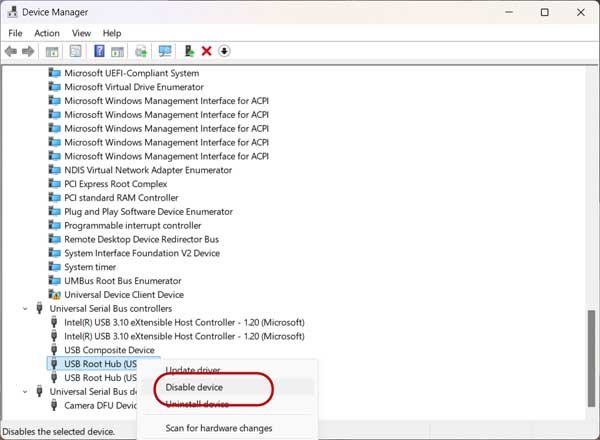
Note: To enable the USB Port again, right-click on it and select Enable Device.
Method 2: Via Registry Editor
1. Open the Registry Editor and navigate to:HKEY_LOCAL_MACHINE\System\CurrentControlSet\Services\USBSTOR
2. On the right pane, double-click the Start DWORD key.
3. Enter 4 in the Value Data field and click the OK to save the settings.
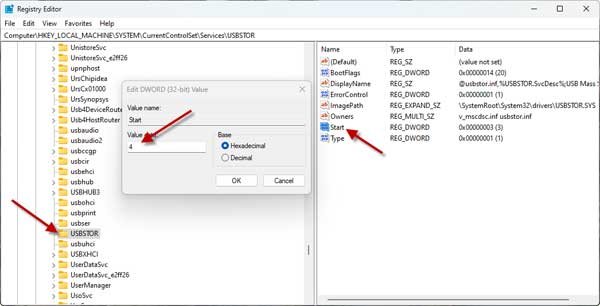
Note: To re-enable USB port, follow the above steps and enter the default Value Data 3.
Method 3: Via the Local Group Policy Editor
1. Open the Windows 11 search and search for Group Policy Editor.
2. Open Local Group Policy Editor, and navigate to:
Computer Configuration > Administrative Templates > System and expand “Removable Storage Access“
3. On the right-pane, double click “Removable Disks:Deny execute access”.
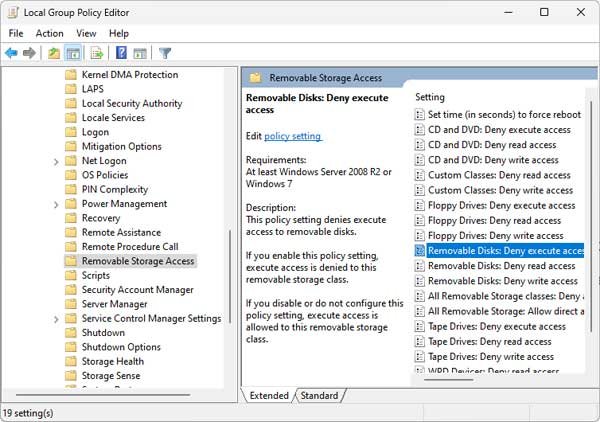
4. On the Window that appears next, select “Enabled” and click OK to save the settings.
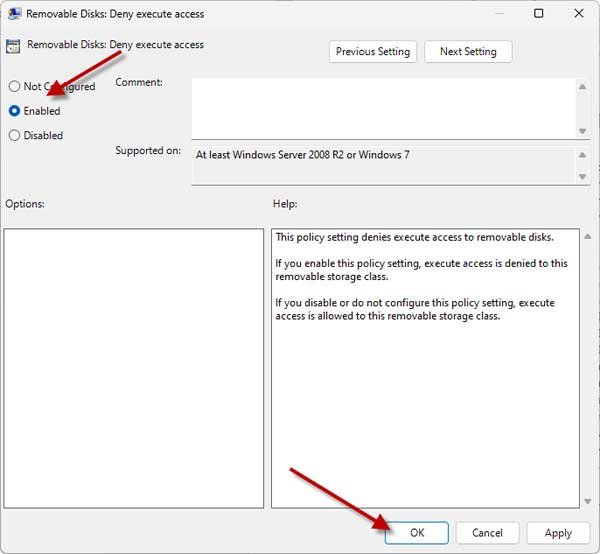
5. Next, double click on the “Removable Disks: Deny read access”, and select the Enabled option.
Note: To re-enable the USB Ports, select Not configured for both settings.
Method 4: Via CMD
1. Open Command Prompt as administrator on your Windows 11 PC.
2. Next, enter the command reg add HKLM\System\CurrentControlSet\Services\cdrom /t REG_DWORD /v "Start" /d 4 /f and press Enter.
3. It will disable the USB Ports on your Windows 11 computer.
Note: To re-enable USB port execute the command: reg add HKLM\System\CurrentControlSet\Services\cdrom /t REG_DWORD /v "Start" /d 1 /f
Method 5: In BIOS or UEFI
You can also disable USB port via BIOS or UEFI settings.
1. Enter BIOS or UEFI settings by pressing the boot menu key (this key varies depending on the motherboard).
2. Once you’re in the BIOS/UEFI settings, navigate to the USB Ports section. Here, you can enable or disable the USB ports.
Finding the option to disable USB ports may be challenging due to the large number of available settings. You might need to scan through all the options to locate the one for disabling USB ports via BIOS or UEFI.

