

Personalization is one of the parts of Windows 11. It lets people shape their computer experience the way they like. One can change themes, wallpapers, colors, icons and more. This makes the device feel one’s own. Windows 11 also offers the option to set per app volume. This adds another layer of personalization.
The ability to set volume for each app in Windows 11 is especially useful for balancing levels between different applications. If some apps are too loud while others are barely audible one can adjust the volume of each app to a preferred level. This way one can enjoy a tailored and comfortable audio experience on the device.
Setting volume for each app in Windows 11 takes a few clicks. If you do not know how to set volume for each app, here is how to change the volume of apps in Windows 11. This method will be handy if one wants to set the volume for a web browser while raising the volume, for a music player.
How to Set the Volume for Individual Apps in Windows 11?
1. First launch all the app that you want to set seperate volume.
2. Next, click the speaker icon shown down in the bottom right corner of your taskbar. You can also use the Win + A shortcut key.
3. It will open the master volume slider along with a volume select button on the right side.
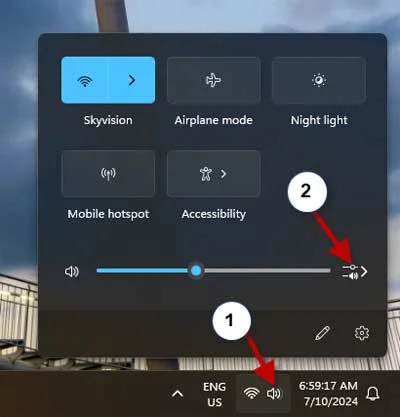
4. To adjust the volume of each app, click the volume selector button and drag the corresponding slider left or right. This will let you turn the volume up or down for that one application, without affecting the overall system volume.
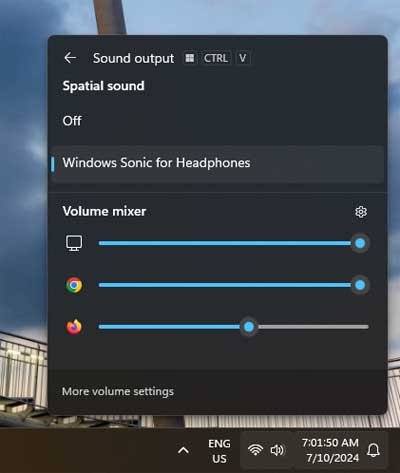
Important: If you don’t see the app you want to adjust in the list, ensure you have launched that program first. The volume controls will show for active apps that are currently open and running.
Note: If you change the volume of an app and then close it the time you open the app the volume will reset to the default level. That means any volume adjustments you made last while the app is open. When you close the app, the volume goes back to the original setting. The changes don’t stay saved after you exit.

