

When you want to print spreadsheets, such as reports, invoices, or presentations, it’s essential to know exactly where each page starts and ends. Excel’s page break feature helps you know printed boundaries before you print your data sheets, similar to how Microsoft Word handles page layout. This simple tool can help you save paper and time by showing you the exact number of pages your spreadsheet will require.
If you haven’t enabled page breaks, or can’t see them in your spreadsheets, you might print your spreadsheet only to find that important data is split awkwardly across multiple pages—or that you’ve wasted paper on unnecessary blank pages.
By displaying page breaks in Excel, you can adjust column widths, row heights, and content placement to ensure your printed output looks professional and organized.
Step-by-Step Guide to Enable Page Breaks in Excel
1. Open your spreadsheet in Excel
2. Click ‘File‘ in the top-left corner
3. Select ‘Options‘ at the bottom of the menu
4. Choose ‘Advanced‘ from the options box
5. Scroll down to find ‘Display options for this worksheet‘
6. Check the box next to ‘Show page breaks‘
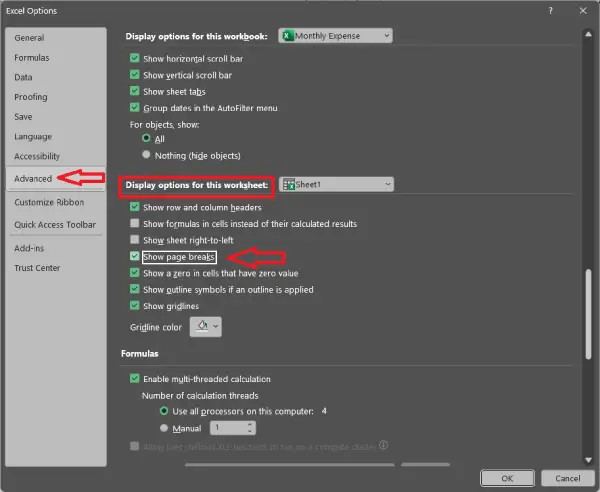
7. Click ‘OK‘ to apply the changes
Once enabled the page break, Excel will display dotted lines throughout your spreadsheet indicating where each printed page will start and end. These visual lines make it easy to identify if your data spans multiple pages or fits neatly on a single sheet.
Making the Most of Page Breaks
With page breaks visible, you can now make informed decisions about formatting. Adjust your data layout to fit within the dotted lines, reorganize columns to prevent awkward splits, or use Excel’s page setup options to optimize your print layout further.
This feature is invaluable for anyone regularly printing spreadsheets for reports, invoices, or presentations. It’s a small setting that delivers significant practical benefits.

