

If you’re experiencing incorrect, damaged, or duplicate icons on your Windows 11 computer, there’s no need to be concerned—it’s likely due to corrupted icon cache files. The icon cache is essential for speeding up the loading and display of icons, and when these files become corrupted, it can lead to incorrect icon display issues.
In this guide, we’ll provide you with clear steps to rebuild the icon cache file on Windows 11 and effectively resolve this problem. There are a couple of methods to rebuild the icon cache in Windows 11, and we will explain each one in detail. These methods will also be applicable to Windows 10.
How to Rebuild Icon Cache File in Windows 11?
You can rebuild the icon cache by running the command ie4uinit.exe -show. If this command does not fix the icon cache issue you can try the Sledgehammer method, which’s a stronger approach and will probably solve the problem with the icon cache.
First Method: Refresh Icon Cache File Using a PowerShell
1. Open the PowerShell (press Win + X and select Terminal from the menu).
2. Next, enter the command ie4uinit.exe -show and press Enter.
3. It will rebuild entire icon cache in Windows 11.
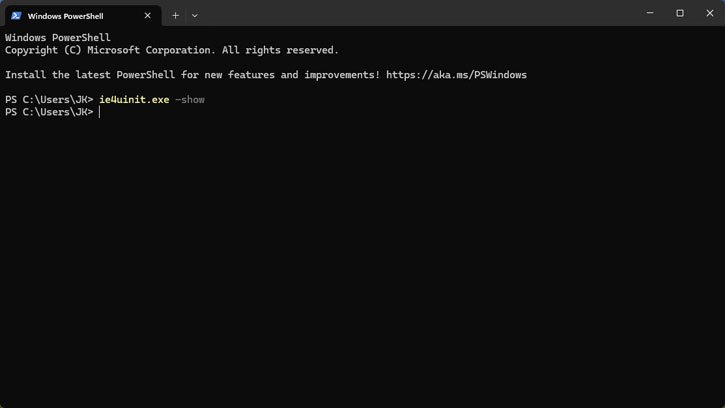
Note that you may not get a response when executing this command. This is normal.
ALSO READ: How to Remove Device Driver Leftovers From Windows 11
Second Method: Refresh Icon Cache Using Command Prompt
1. Open Command Prompt as an Administrator and execut below commands on-by-one.
2. Type the command ie4uinit.exe -show and press Enter.
3. Enter the command taskkill /IM explorer.exe /F and press Enter.
4. Type CD %userprofile%\AppData\Local and press Enter.
5. Type del iconcache.db /a and press Enter.
6. Type CD %localappdata%\Microsoft\Windows\Explorer\ and press Enter.
7. Type del iconcache* and press Enter.
8. Type start explorer.exe and press Enter.
These commands will help fix the corrupted icon cache files, allowing icons to display correctly on your Windows 11 and Windows 10 systems.
If you do not know what are these commands do on your Windows 11.
- ie4uinit.exe -show: It refreshes the icon cache and can fix minor issues with icons.
- taskkill /IM explorer.exe /F: It will close the Windows Explorer process. Windows Explorer is responsible for displaying the desktop and file management, and restarting it may fix the icon cache issue.
- CD %userprofile%\AppData\Local: It changes the directory to the Local AppData folder of the current user. This folder contains the icon cache files.
- del iconcache.db /a: It will delete the file named iconcache.db, which stores the icon cache. Removing this file is essential for rebuilding the icon cache.
- CD %localappdata%\Microsoft\Windows\Explorer\: It changes the directory to the Explorer folder within the Local AppData. This folder contains additional icon cache files.
- del iconcache*: It will delete all files that start with “iconcache” in the current directory. This ensures that any remaining corrupted icon cache files are removed.
- start explorer.exe: It will restart the Windows Explorer process, allowing the system to rebuild the icon cache with fresh data.
Important: Note that rebuilding icon cache may not fix all problems related to icons.
For example if an icon file has been moved to a spot or removed from the system rebuilding the icon cache will not fix the problem. In those moments the system may still show wrong or missing icons because it cannot locate the icon files.
So although rebuilding the icon cache can help with some display glitches it may not solve problems that come from changes, to the icon files.

