

The Snipping Tool in Windows 11 now lets you pick which folder you want to save your screenshots and screen recordings in. Before this update every time you took a screenshot, the Snipping Tool would just copy it to your clipboard and saved the Screenshots folder inside your Pictures folder. That has all changed with the Windows 11 update.
The latest Windows 11 update adds a setting for the Snipping Tool to choose the folder for your captured screenshots and screen recordings yourself. I think this is great because you do not have to mess around with the registry to change things anymore. Here is how you can pick your place to save your screenshots in the Snipping Tool.
How to Select Any Folder to Save Screenshots in Snipping Tool?
1. Open the Snipping Tool and click the three-dot menu at the top-right and select Settings.
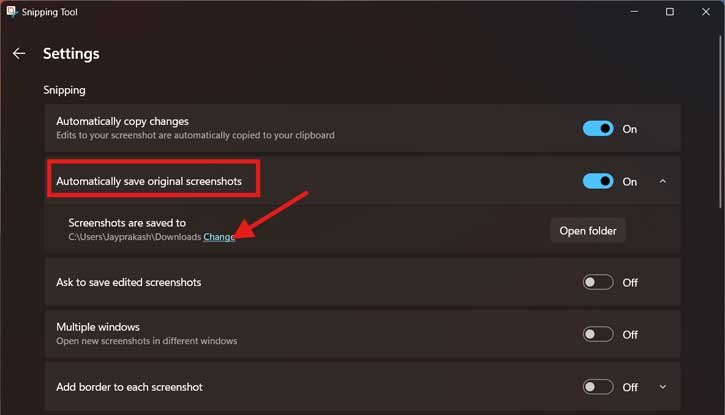
2. Now under ‘Automatically save original screenshots’ option, click ‘Change’.
3. Next, choose a new folder or location on your computer to save the screenshot.
4. For screen recordings, under ‘Automatically save original screen recordings’ option, click ‘Change’ and select a new folder.
That is all how to change the save location in Snipping Tool on your Windows 11 PC. This feature is currently only available for people who are part of the Windows Insider program and have the preview version of Windows 11 (build 22635.4291) and the Snipping Tool version 11.2408.15.0 or later.
If you’re not part of the Windows Insider program, you might have to wait a few more weeks before this feature becomes available in the regular, stable version of Windows 11 24H2.
For your information, Microsoft starts rolling out Windows 11 24H2 update to supported devices with several changes and features. Revamped Copilot app with a refreshed UI and features, an improved context menu, a scrollable quick settings panel, Wi-Fi 7 support, Wi-Fi refresh button, AI voice clarity, Linux’s Sudo command support, option to create 7-Zip and Tar archive files, new Energy save mode, etc. are the main features of Windows 11 24H2 update.

