
In the recent Windows 11 24H2 update, Microsoft introduced a significant yet often overlooked feature: a toggle for natural mouse scrolling. This setting enables users to modify the scrolling direction of their mouse, providing a more intuitive experience that mirrors the natural movement of their fingers, similar to using gestures on smartphones and tablets.
By enabling natural scrolling, users can scroll content in the same direction as their finger movement, which can enhance usability and comfort, particularly for those accustomed to touch gestures on smartphones and tablets. Previously, scrolling up would move your document downward, while scrolling down would move it upward, as the interaction was primarily with the scroll bars rather than the content of the page itself.
In previous versions of Windows, the only method to enable natural or logical mouse scrolling—similar to the experience on a tablet or smartphone—was to delve into the Registry, even though natural scrolling had long been offered as an easy one-click option for trackpads.
How to Enable Logical/Natural Mouse Scrolling on Windows 11 24H2
1. To adjust the scrolling direction on your Windows 11 device, open the Settings app (or press Windows + I to access it).
2. From the left sidebar, select “Bluetooth & devices,” then click on “Mouse.”
3. In the Scrolling section, choose “Down motion scrolls down” from the menu if you prefer it to function like a tablet.
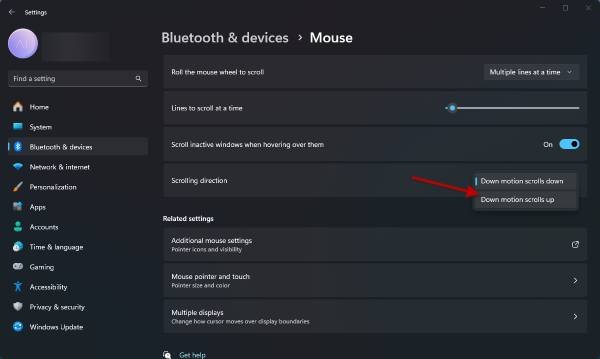
4. Alternatively, selecting “Down motion scrolls up” will maintain the traditional Windows scrolling behavior.
This update reflects Microsoft’s ongoing commitment to improving user experience by providing customizable options that cater to individual preferences, even if such features may not be immediately noticeable to all users.