

If Microsoft Word is not working properly or if you’ve been adjusting the settings and things have gone wrong, you may want to reset it to its default settings to resolve the issue. In this guide, let us learn 3 methods to reset your Word to its default configuration, and troubleshoot any problems you may be experiencing.

You can reset Microsoft Word to its default settings in multiple ways. From Windows registry, Renaming the Word template, or resetting all Office settings are these methods.
If your Word behaves oddly, follow these steps to restore Microsoft Word to its original configuration and enjoy a smooth document editing experience.
How to Reset Microsoft Word to Default Settings
Method 1: Reset Word to its default settings by using Windows Registry.
1. Open the Windows Registry Editor on your Windows 11/10 PC.
2. Then, navigate to HKEY_CURRENT_USER\Software\Microsoft\Office\16.0\Word (note that “16.0” may vary based on your Office version).
3. Right-click the Word key and select “Delete” to remove it.
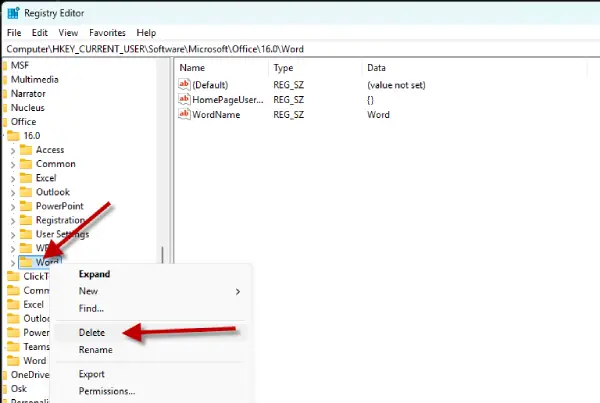
4. Exit the Registry Editor and restart your PC.
5. Microsoft Office will create a new Word, which will reset to its default settings.
ALSO READ: How to Digitally Sign a Google Docs: 4 Easy Methods
Method 2: Changing the Template Name (Normal.dotm file name)
Renaming the Microsoft Word template can also help reset the application. Follow the steps below to do this:
1. First, close all the Microsoft Office applications, if running on your computer.
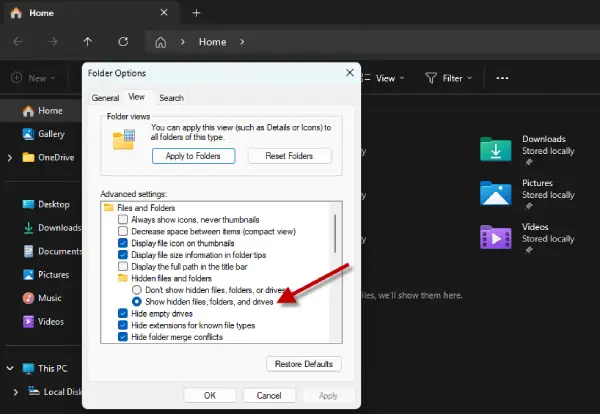
2. Now, open File Explorer, click the three dots and select Options.
3. Select View tab, click Hidden files and folders and select “Show hidden files, folders, and drives” option.
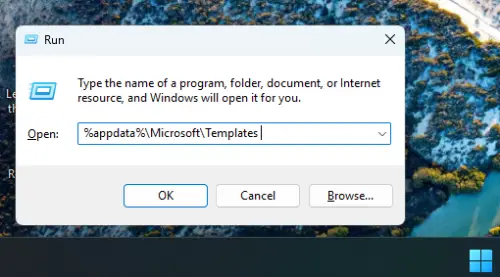
4. Now, click Windows + R to open the Windows Run dialog box, %appdata%\Microsoft\Templates and press Enter key.
5. Right click Normal.dotm file, select Rename and rename the file name as Normal.old.
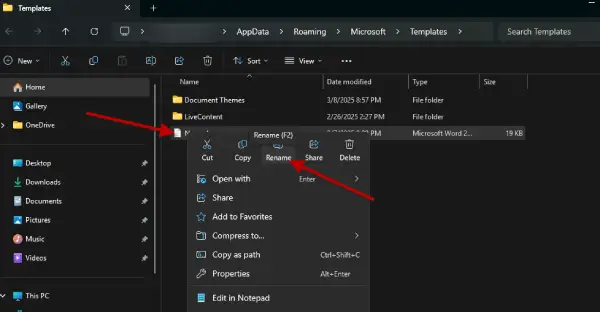
6. This will allow Microsoft Word to create a new file with its default settings.
Method 3: Resetting Microsoft Office Settings
In addition to the above two methods mentioned above, users can also reset all settings for Microsoft Office. But it will reset all Microsoft Office applications.
1. In Windows Search, type Office, right-click the Office app and select App Settings.
2. In App settings, click Reset option.
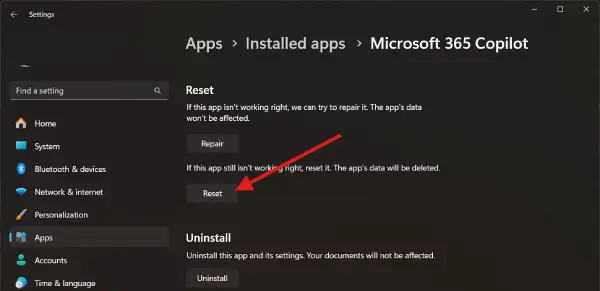
3. This will reinstall Microsoft Office and reset it to default settings.
With the solutions outlined above, Windows 11 users can easily reset Microsoft Word to its default settings. By following these methods, you can effectively troubleshoot and resolve any issues you may encounter, ensuring a smooth and efficient document editing experience.

