

Have you ever used the Name Box in Excel? It is a small field in the top-left corner of your Excel worksheet that most people ignore, but it’s actually a productivity tool. Located just above column A, this humble box can save you hours of spreadsheet work once you learn how to use it.
If you work with large spreadsheets, the Name Box transforms the way you navigate and organize your data. Jump anywhere in your workbook instantly, select massive amount of data without dragging, and create plain-English names for your data are the main uses of the Name Box.
Table of Contents
How to Use Excel’s Hidden Productivity Tool, Name Box?
Jump Anywhere in Your Workbook Instantly
The Name Box lets you teleport to any cell or range in your worksheet faster than you use “Page Down.” Type a cell reference directly into the Name Box and press Enter to jump there instantly.
For example:
- Type A700 to jump 700 rows down in less than a second
- Type XFD1048576 to leap to the bottom-right corner of your worksheet
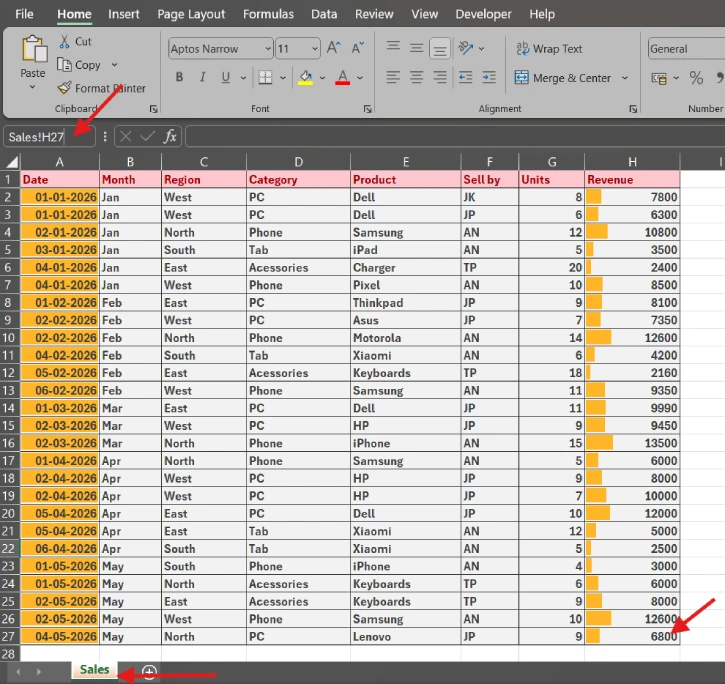
- Type Sales!H27 to jump to cell H27 in your Sales worksheet from anywhere in your workbook
This works across your entire file, so you never need to manually scroll through large datasets again. Also, if you rename your worksheets with descriptive names (like “Sales” instead of “Sheet2”), navigation becomes even more intuitive.
Select Massive Ranges Without Dragging
Dragging your mouse through thousands of cells is slow, frustrating, and error-prone. The Name Box eliminates this completely by letting you select any range with a single typed command.
Type a range reference into the Name Box and press Enter to select it instantly. Here’s what that looks like in practice:
Type A1:H700 into the Name Box and Excel immediately selects all 5,600 cells in that range, even if they’re scattered across multiple screens. Once selected, you can:
- Apply conditional formatting to the entire range
- Copy and paste the data
- Adjust formatting without worrying about accidentally selecting extra rows
This approach is especially powerful when you want to select a specific section of a larger dataset without scrolling to find the edges first.
ALSO READ: Stop Hunting Through Pivot Tables: Use GETPIVOTDATA to Build Self-Updating Reports
Create Plain-English Names for Your Data
Ranges like H2:H27 aren’t memorable, and they make formulas harder to understand. The Name Box lets you assign meaningful names to important data areas so you can reference them throughout your workbook.
Select a block of data, click into the Name Box, type a label, and press Enter to create a named range.
For example:
- Select cells H2 through H27 (your Q1 sales figures)
- Click the Name Box
- Type Q1_Sales
- Press Enter
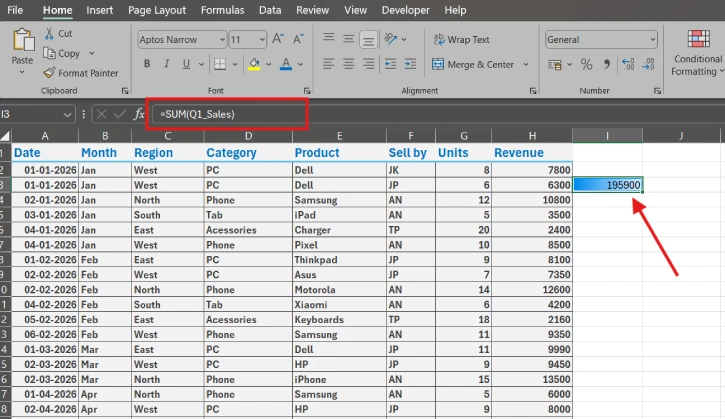
Now, instead of writing a formula like =SUM($H$2:$H$27), you can write =SUM(Q1_Sales). Anyone reading your spreadsheet instantly understands what the formula calculates without hunting for the underlying cells.
Naming Rules to Remember
When creating named ranges in Excel, follow these simple guidelines:
- Start with a letter or underscore: Names can’t begin with numbers or special characters
- No spaces allowed: Use underscores, periods, or CamelCase instead. For example, Q1_Sales, Q1.Revenue, or SalesTotal.
- Avoid cell-reference names: Don’t use names like A1, Z100, or R1C1—Excel will interpret them as cell locations
- Uppercase is optional: Excel treats Sales, SALES, and sales as identical, so use capitals only for readability
Navigate Like a Pro with Your New Menu
Once you’ve created named ranges, the Name Box becomes a built-in navigation menu. Click the small drop-down arrow on the right edge of the Name Box to see a list of every named range in your workbook.
This eliminates the need to remember where important data lives. Instead of scrolling or typing cell references, you can simply click a named range to jump straight to it.
ALSO READ: 7 Claude Prompts to Analyze Google Sheets & Excel Data Like a Pro
A Final Tip: Use Excel Tables for Growing Data
If your dataset will continue growing over time, convert it into an Excel table using Ctrl+T. Tables automatically expand as new rows are added, and their structured references update automatically. This keeps your named ranges fresh without manual maintenance.
Conclusion
The Name Box is proof that Excel’s biggest time-savers are often hiding in plain sight. Once you start using it regularly, you’ll wonder how you ever worked without it.

