

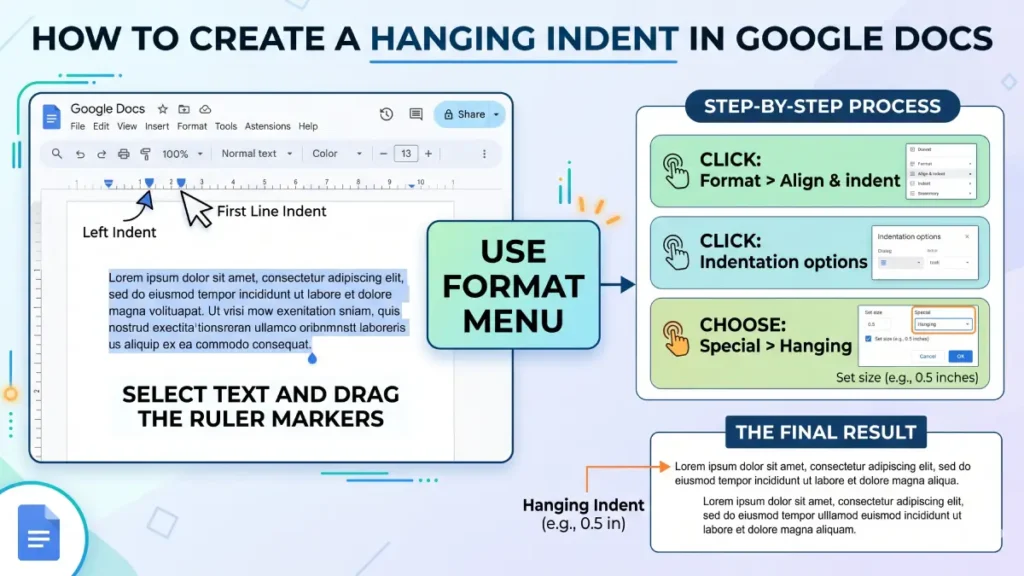
Creating a hanging indent in Microsoft Word and Google Docs is straightforward. To apply this paragraph formatting style, go to paragraph settings, find the ‘Indentation’ options, and select ‘Hanging’ under ‘Special’. This step-by-step guide will walk you through the process.
What is Hanging Indent & How to Create it in Word and Docs
Before start, let us know what is a hanging indent. It is a paragraph formatting style in Word and Docs where the first line remains at the left margin while all following lines are indented inward. The 0.5 inches (1.27 centimeters) measurement is a standard default, though it can be adjusted.
This formatting technique is essential for creating professional documents and improving readability in various contexts. This formatting style has become the standard in academic writing because it creates visual separation between entries while maintaining a professional appearance.
Steps to Create a Hanging Indent in Microsoft Word
1. First, select the text you want to format with a hanging indent
2. Open the Paragraph dialog by going to the Home tab and clicking the Paragraph settings icon (or press Ctrl+M)
3. Navigate to the Indents & Spacing tab if not already open
4. Locate the Special dropdown under Indentation options
5. Select “Hanging” from the dropdown menu
6. Confirm the indent amount (default is 0.5 inches; adjust if needed)
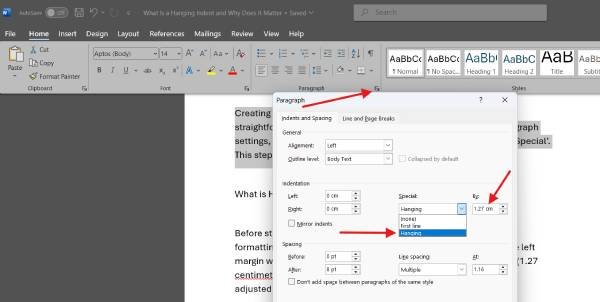
7. Click OK to apply the formatting
Note: Alternatively, you can use the ruler at the top of your document to manually adjust indents by dragging the hanging indent marker.
Steps to Create a Hanging Indent in Google Docs
1. Highlight the text you want to format
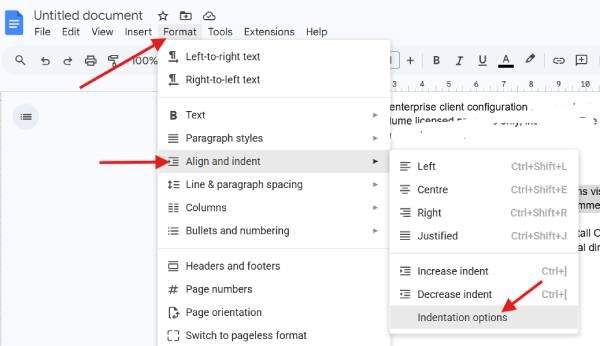
2. Click Format in the top menu
3. Select Align & indent from the dropdown
4. Choose Indentation options (or click the indent icon)
5. Find the Special section and select “Hanging“
6. Adjust the indent amount if desired (default is typically 0.5 inches)
7. Apply the formatting by closing the dialog
Note: Google Docs also allows you to use the ruler at the top of the page to adjust indents visually by dragging the indent markers.
Best Practices for Using Hanging Indents
To ensure your hanging indents are properly formatted and effective:
- Use the same indent measurement throughout your document
- Different citation styles (APA, MLA, Chicago) may have specific indent requirements—verify before formatting
- Ensure your indent amount doesn’t make text difficult to read
- Reserve hanging indents for bibliographies, reference lists, and structured entries where they add value
- Hanging indents are best suited for specific formatting needs; avoid applying them to body text
Troubleshooting:
Problem: The indent isn’t applying correctly
Ensure you’ve selected all the text you want to format. Check that you’re using the “Hanging” option, not “First line” indent
Problem: The indent measurement seems off
Verify the indent amount in the settings (should typically be 0.5 inches or 1.27 centimeters). Check your document’s margin settings, as these affect overall indentation
Problem: Hanging indents appear differently when printed
Preview your document before printing. Adjust indent measurements if needed to account for printer margins
Final Thought
Creating a hanging indent in both Microsoft Word and Google Docs is a quick, essential skill for formatting professional and academic documents. Whether you’re organizing a bibliography, formatting a resume, or creating a glossary, hanging indents make your content more readable and visually organized. By following the simple steps outlined above, you can apply this formatting style in seconds and maintain a polished, professional appearance across all your documents.

